
Download Virtual Camera Plugin Installer
Download
Get the latest Virtual Camera Installer here: Download Plugin Installer Version 1.4
(For mimoLive version 2.3 through version 2.7 use the Plugin Installer Version 1.1 )
Are you looking to enhance your video conferencing and meeting experience? Look no further than mimoLive’s virtual camera plugin. With this special application of the virtual camera, you can take advantage of external cameras, switch between multiple cameras, and even add graphic layers like logos and lower-thirds for a professional touch.
The benefits don’t stop there – mimoLive’s virtual camera plugin also allows for picture-in-picture video, pre-recorded video playback, screen and window sharing, stinger videos, and even a timer. And the best part? This plugin can be used with popular video conferencing software like Zoom, MS Teams, GoToMeeting/GoToWebinar, Jitsi, Webex, and more.
Upgrade your virtual meetings with mimoLive’s virtual camera plugin and take your video conferencing game to the next level.
Note:
Some software may require the use of the web client in Chrome to access the virtual camera feature
What is a virtual camera plugin?
The Virtual Camera Plugin is a powerful feature of mimoLive that enables users to simulate the existence of a webcam and use any input as a source, including pictures, pre-recorded videos, or edited live videos from cameras. With this plugin, users can easily create professional-looking live streams or video content by incorporating various media into their broadcasts. The Virtual Camera Plugin can be used with popular video conferencing and live streaming platforms, making it an essential tool for content creators, educators, and businesses who want to take their video production to the next level. Whether you’re looking to add a new dimension to your presentations or want to create engaging video content, the Virtual Camera Plugin is the perfect solution.
How to add a logo to my video call with the virtual camera plugin?
1. Use mimoLive to add a logo layer to your webcam video and use the virtual camera plugin as the video output.
2. Change the video source of the conference software to the virtual camera and this will send the modified video to the video call.
Using mimoLive’s virtual camera plugin with video conferencing software gives you a lot of advantages:
- Use external cameras
- Switch between several cameras
- Picture in picture video
- Add graphic layers such as logos and lower-thirds for visual improvements
- Show pre-recorded videos
- Screen and Window Sharing
- Display stinger videos
- Display a timer
mimoLive’s Virtual Camera Plugin can be used for any video conferencing software like:
- zoom.us
- Skype
- MS Teams (Virtual Camera is not supported by the MS Teams App and works only in the web browser version)
- remo.co
- Jitsi Meet
- or any other application which accepts a video camera as an input device.
Tutorial for Video Conferencing
See Video Conferencing Software for a tutorial on how to do this.
Installing the Virtual Camera Plugin
mimoLive needs a running Virtual Camera plugin which you can install in a few steps.
- Run the installer. Please note that you will be prompted for your administrator password.
- Restart your Mac for the plugins to be loaded into macOS.
Adding a Virtual Camera Output Destination
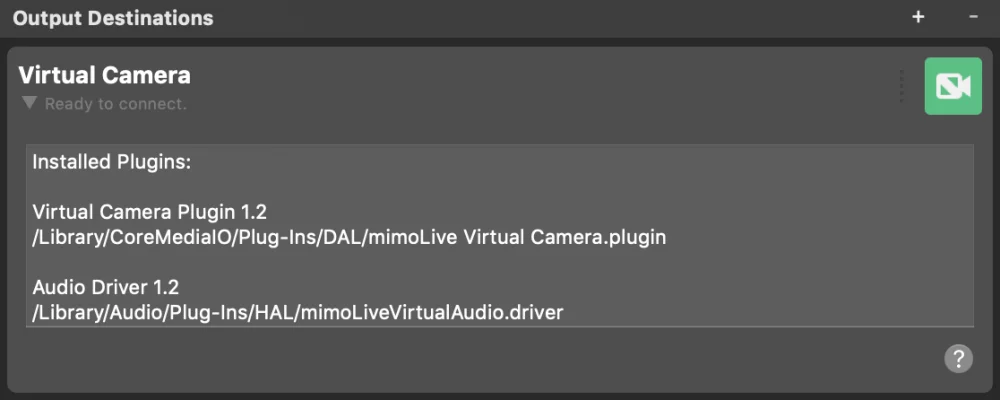
Add a Virtual Camera Output Destination to your Output Destination list by clicking the + button on top of the list in the rightmost column of your mimoLive document. A popover window will appear with all the Output Destination options available. After double-clicking the Virtual Camera Output Destination icon a new instance will appear in the Output Destination list. The info box will tell you the status of the plugin and where it is located on your disc.
Using the Virtual Camera
- Open a mimoLive document and add a virtual camera to the output destinations
- Set up the Video and Audio options to select which video and audio should be used.
- Open the third-party software of your choice
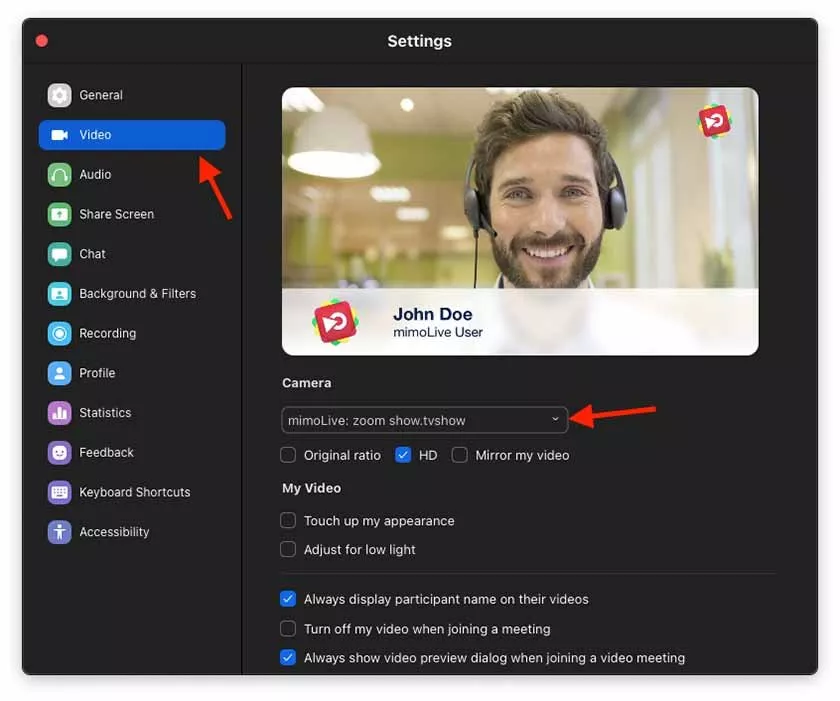
- Configure the video and/or audio input of the third-party software to use the device named mimoLive:
- Once mimoLive is streaming video to another application the Virtual Camera Live button turns red
The Virtual Camera Output Destination goes live automatically
There is no need to switch the Virtual Camera Output destination live because it will switch on automatically if it is used by another application.

In the Video option you can select which video you want to output via the Virtual Camera: Either the Program Output or a specific Video Source from the Sources Repository.
In the Audio drop down menu you can select which audio should be used in the Virtual Camera: Either the Program Out Audio Mix, a specific custom Audio Mix or any audio source that has an associated audio source with it. Please refer to Audio Mix Panel to learn more about setting up audio mixes.
Launch sequence matters
First, create and open the mimoLive document with the Virtual Camera Output Destination. Second open the third-party app after creating the mimoLive document! This often helps third-party apps to see the mimoLive Virtual Camera right away in their video setups.
Usage restrictions
– mimoLive Virtual Camera does not work in apps that are based on QuickTime.
– The Virtual Audio output can only be used by a single app at a time. (The System Preferences audio pane also counts as an app.)
Uninstalling the Virtual Camera Plugin of mimoLive
If you want to uninstall the Virtual Camera Plugin for mimoLive you need to remove two files from your macOS. Please follow these steps:
- Select the “Go To Folder…” item in the “Go” menu of macOS Finder. A new window will pop up asking you for a folder path.
- Enter this path and hit “Go”.
/Library/CoreMediaIO/Plug-Ins/DAL/- In the current Finder window the content of the DAL folder should show up.
- Find the “mimoLive Virtual Camera.plugin” file and move it to the trash. You may be prompted to enter an administrator password for your machine.
- Again select the “Go To Folder…” item in the “Go” menu.
- This time enter the following path:
/Library/Audio/Plug-Ins/HAL- In the current Finder window the content of the HAL folder should show up.
- Find the “mimoLiveVirtualAudio.driver” file and move it to the trash. You may be prompted to enter an administrator password for your machine.
- Restart your Mac.