Using the virtual camera plugin allows you to send advanced videos to video conferencing software, like zoom.us.
Benefits of using virtual camera plugin:
- Use external cameras
- Switch between several cameras
- Picture in picture video
- Add graphic layers such as logos and lower-thirds for visual improvements
- Show pre-recorded videos
- Screen and Window Sharing
The tool to do this is called a Virtual Camera. For Zoom, it looks like it’s a camera and microphone connected to your computer, except it comes out of mimoLive.
*For technical reasons, the Virtual Camera needs to be installed separately. Go to the Virtual Camera manual page, download and install it.
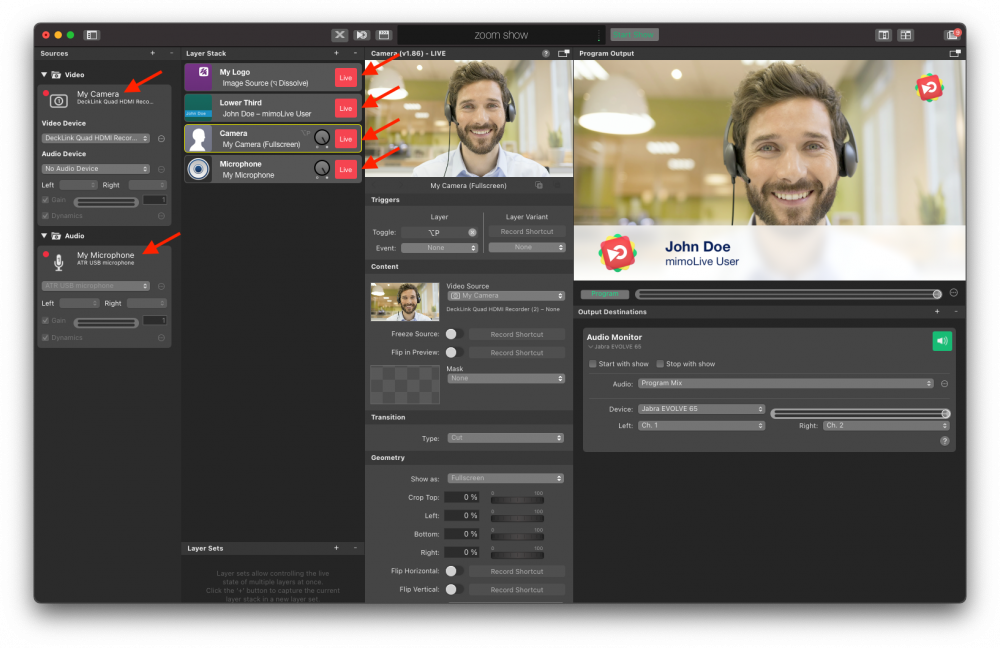
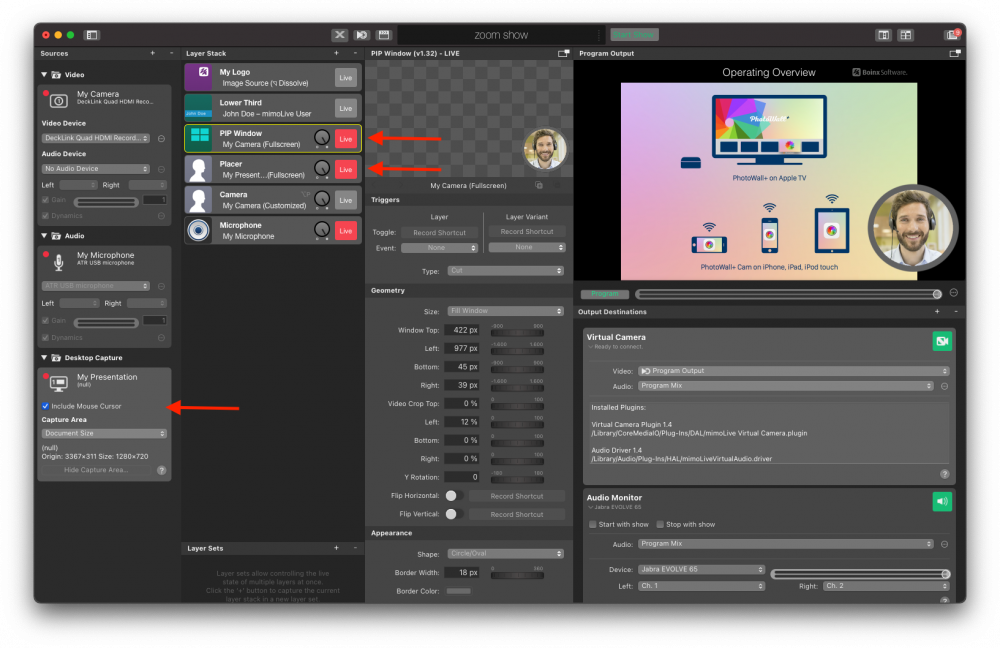
Next, set up a basic document with a source for your camera, a source for your microphone and the matching layers in the layer stack. It’s very sensible to name the sources and layers so you can easily identify what is doing what. You can also add a logo and other graphics elements:
Then, add the Virtual Camera to the Output Destinations. To do this, click on the “+” button and choose “Virtual Camera”. If it is installed correctly, the Live Button in the Virtual Camera output is going to be green:
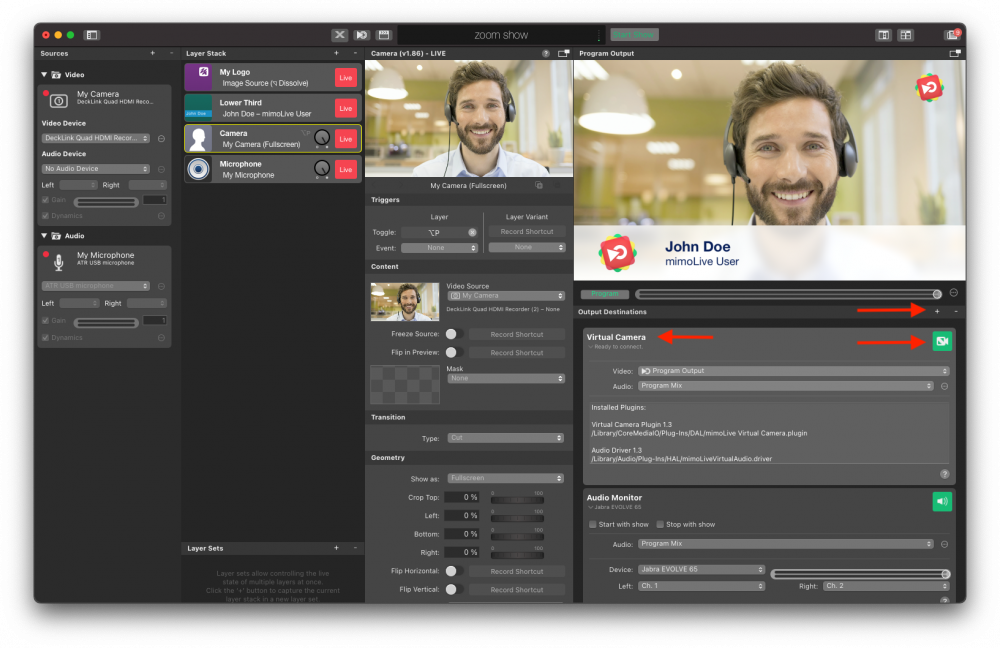
*Note: Unlike the other output destinations, you do not need to switch the Virtual Camera live. Once it is being used, the button will turn red automatically. This is a normal operation.
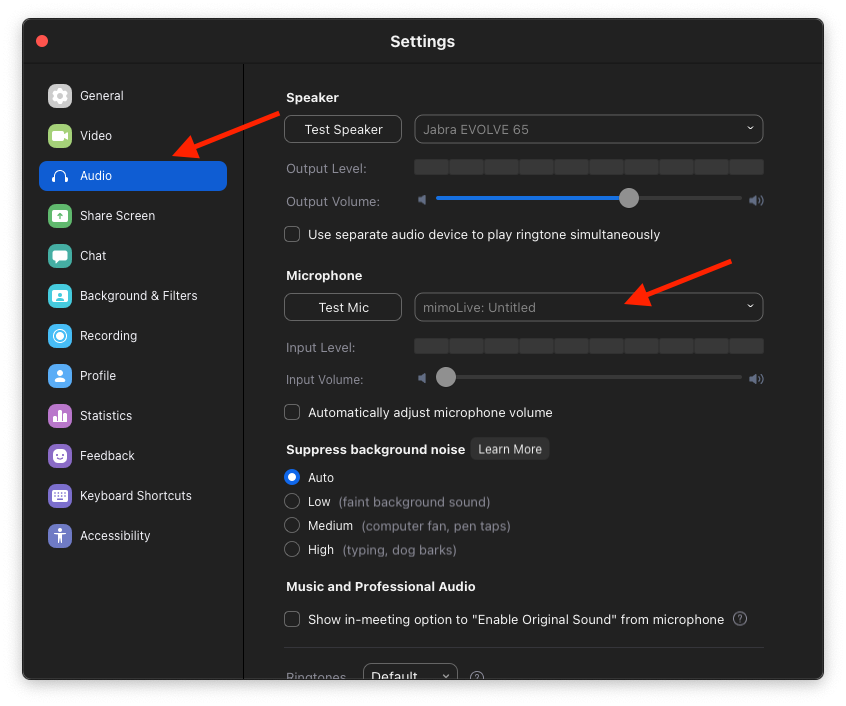
Using the Virtual Camera in Zoom
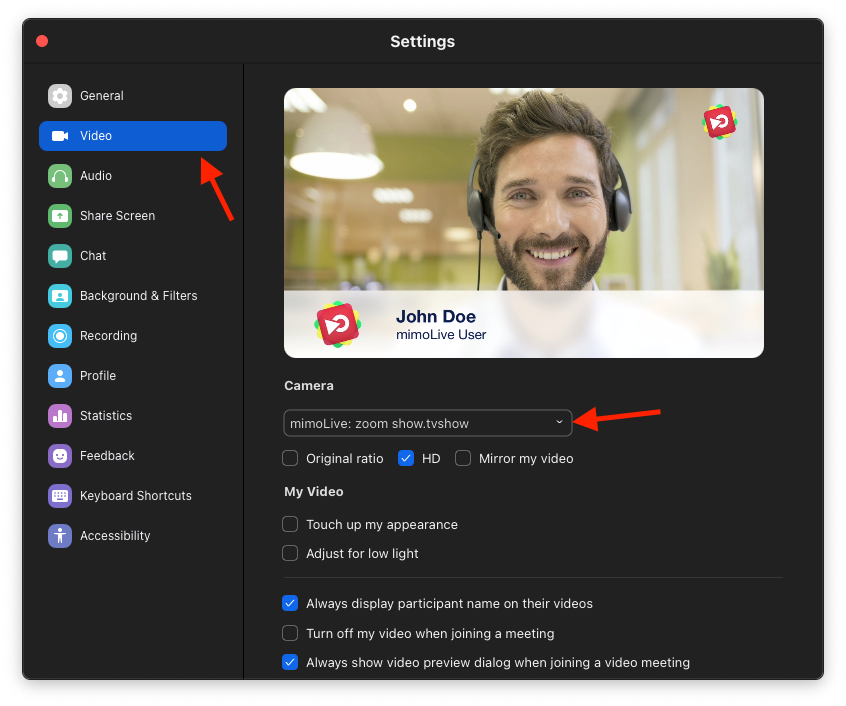
Once your mimoLive document is set up, you can use the Virtual Camera in Zoom both as the camera and the microphone. Simply select mimoLive from the respective popup menus:
!Note: In some apps, the Virtual Camera might not show up. This is because, if not implemented correctly, the Virtual Camera can be a security issue for the video conferencing app. To avoid this, some vendors simply chose to disable Virtual Camera support, while others, like Zoom, decided to go the extra mile to implement Virtual Camera support in a secure way.
What to do if the Virtual Camera isn’t showing up in your video conferencing app
There are three possible workarounds that usually work for the other vendors as well:
- Remove the signature from the client app. If you want to do this, use Google to find the commands needed. This method is generally not recommended unless you know what you’re doing.
- Use the web client for the video conferencing service in Google Chrome. Chrome was the first application to fix the security issue with Virtual Cameras. Make sure you launch Chrome only after you loaded the mimoLive document that contains the Virtual Camera output so that Chrome recognizes it.
- Use a separate computer with an HDMI to a USB input device that works like a USB Webcam (ATEM Mini, Elgato Cam Link) and set up mimoLive to play out your audio and video over this HDMI device via a USB-C to HDMI cable.
Adding your PowerPoint or Keynote presentation
Although you can share your presentation to Zoom in other ways, you can get more interesting effects by adding it to your video feed. For example, you can stay in the picture that your audience is focusing its attention on. The presentation doesn’t take center stage from you.
There are many options on how to add a Keynote or PowerPoint presentation to your video. All of them have in common that you have to set up a Source that captures the presentation. What kind of Source to use depends on how you plan to play your presentation.
Using the same Mac:
- Play the presentation in a Window. In a recent release, Apple has added this option to Keynote. This is good if you have only one screen and want to use other things on the same computer at the same time. Use a Window Capture source to capture the Keynote window.
- Play the presentation on an external screen. This is the option that works best for most people. Connect a second screen to your Mac and set it to 1080p. Play your presentation full screen on that external display. Capture the entire external screen with a Screen Capture source.
Using a second Computer, Phone or Tablet:
This method takes the load off the mimoLive Mac and makes your setup easier to manage as the control for the presentation is entirely removed from the operation of mimoLive. Capture the external computer/phone/tablet via HDMI with an HDMI capture device. There are many devices available on the market for HDMI to USB-3 capture and HDMI to Thunderbolt (for example the Blackmagic DeckLink Mini Recorder). Please note that a simple USB-C to HDMI cable is not sufficient and if your Mac has an HDMI connector, that is only for output.
In this example, a Screen Capture source is added to get the presentation into mimoLive. mimoLive then offers unlimited possibilities to create the output. For example, the speaker could appear in a circle in front of the slides as in this example, where a Placer layer is used to display the presentation and a PiP Window layer is used to display the speaker in front of it:
Getting Sound from your PowerPoint or Keynote presentation
If your presentation includes sound, you’ll have to do some additional steps to capture it with mimoLive.
*Loopback by Rogue Amoeba is the best tool for A/V professionals on the Mac. It allows you to route audio from anywhere to anywhere in macOS, for example, capturing audio from your presentation and sending it into mimoLive. You can also use Loopback to add audio effects to your microphone, capture sound from YouTube videos in Safari, route the audio from Zoom into mimoLive (more about this further down) and much more. It is well worth the money. A free alternative is open source project Blackhole but it is much more limited in functionality.
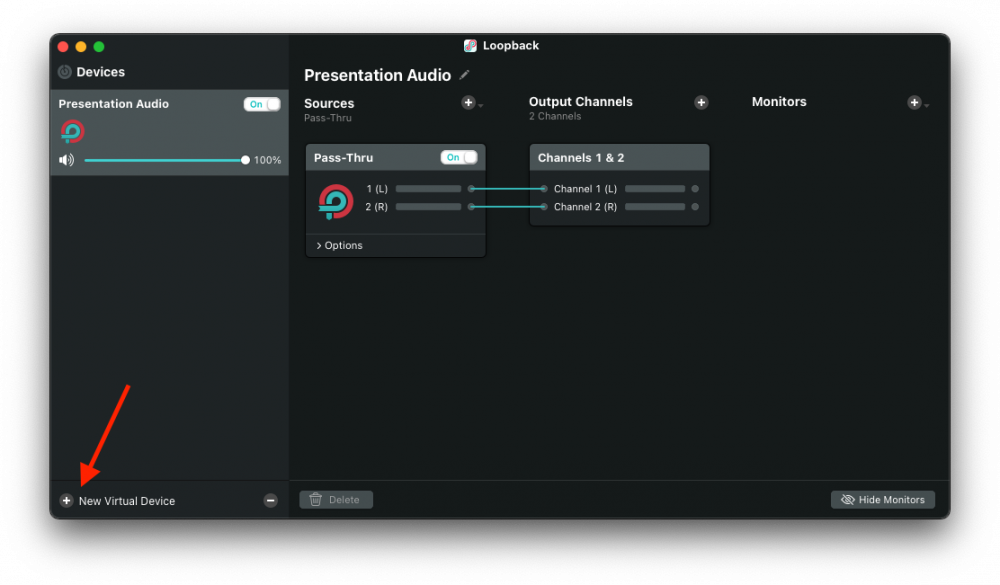
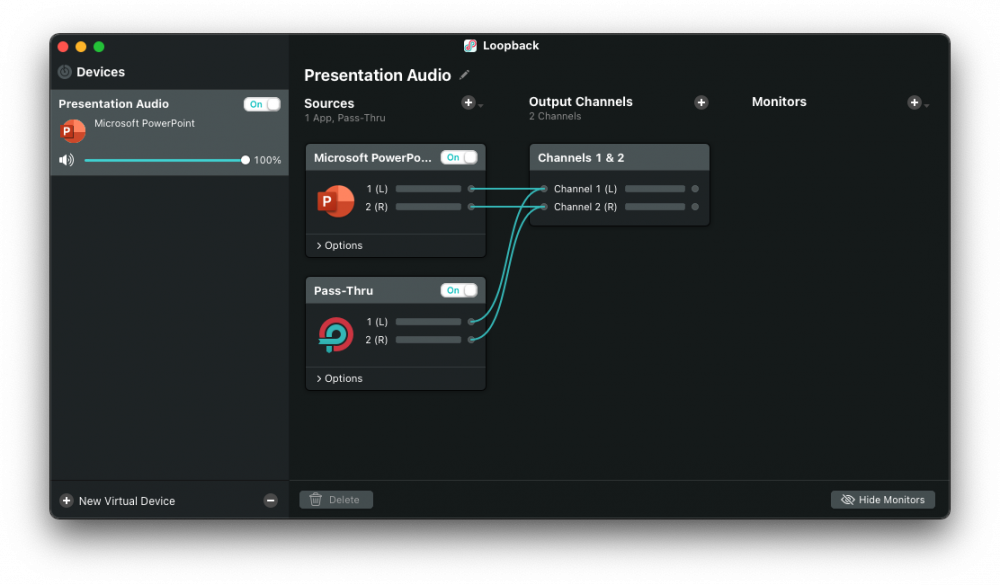
In this example, we’re using Loopback. In Loopback, create a “New Virtual Device”. Rename it to “Presentation Audio:
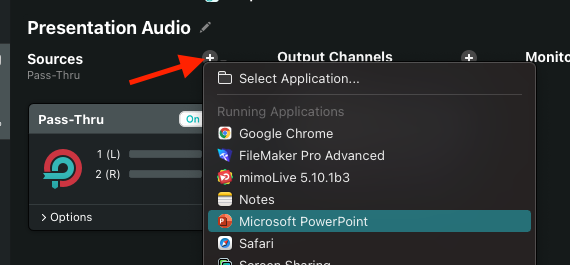
Click on the little “+”-button next to “Sources” and select “PowerPoint” (or “Keynote”) from the popup menu:
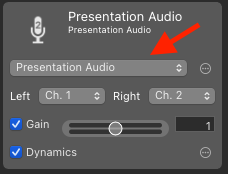
Now, in mimoLive, add an Audio Source, name it “Presentation Audio” and select the Presentation Audio virtual device:
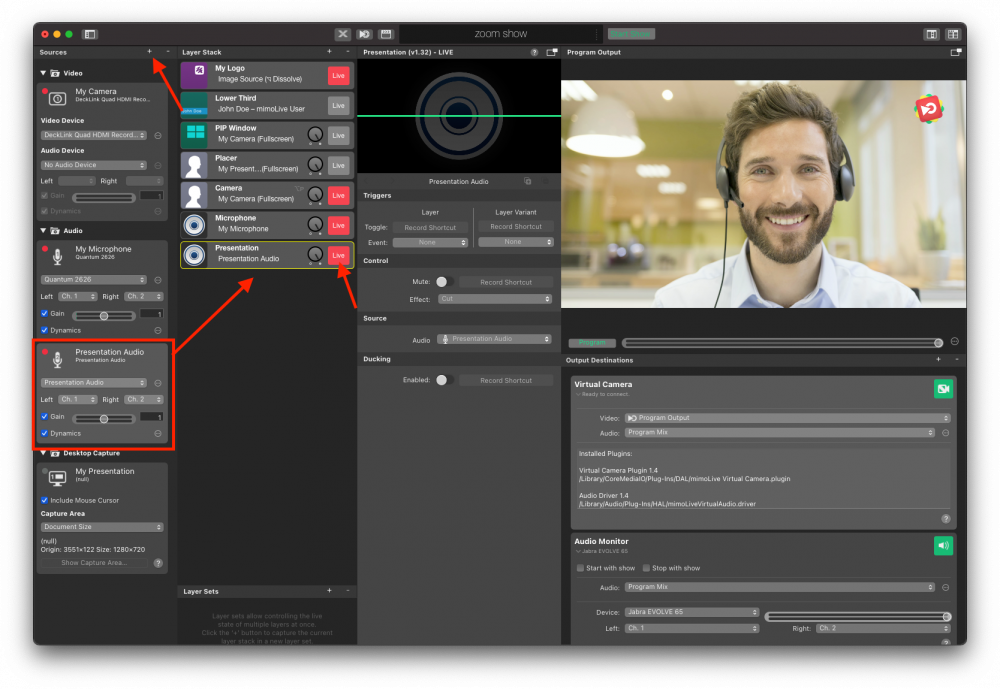
You can drag this to the Layer Stack to create an Audio Only layer which has the source already selected. Don’t forget to switch it live:
When your presentation now includes music or videos, that audio will also be included in your program output.
Playing a video
Playing a video into the Zoom meeting is very straightforward:
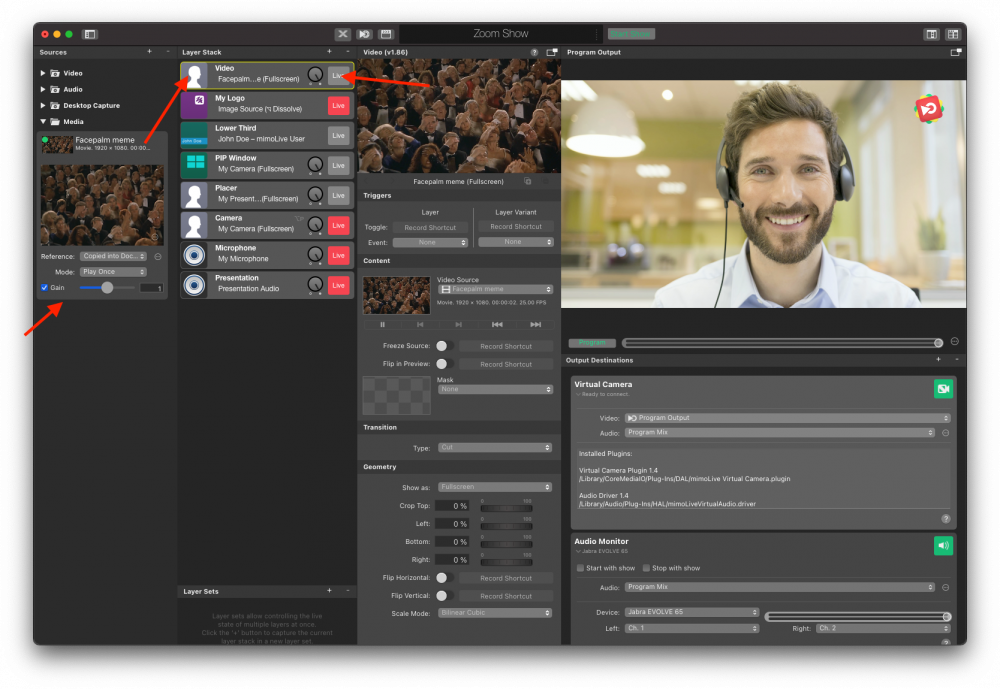
- First, add the video to your Sources by dragging it into the Source column.
- Then drag it to the top of the Layer Stack to create a Placer Layer
- Finally, switch the Placer Layer live to play it.
*For the best audio experience, make sure that you use the “Turn on original sound” button in Zoom so that the Zoom noise reduction doesn’t try to cancel out the audio from the video you’re playing.
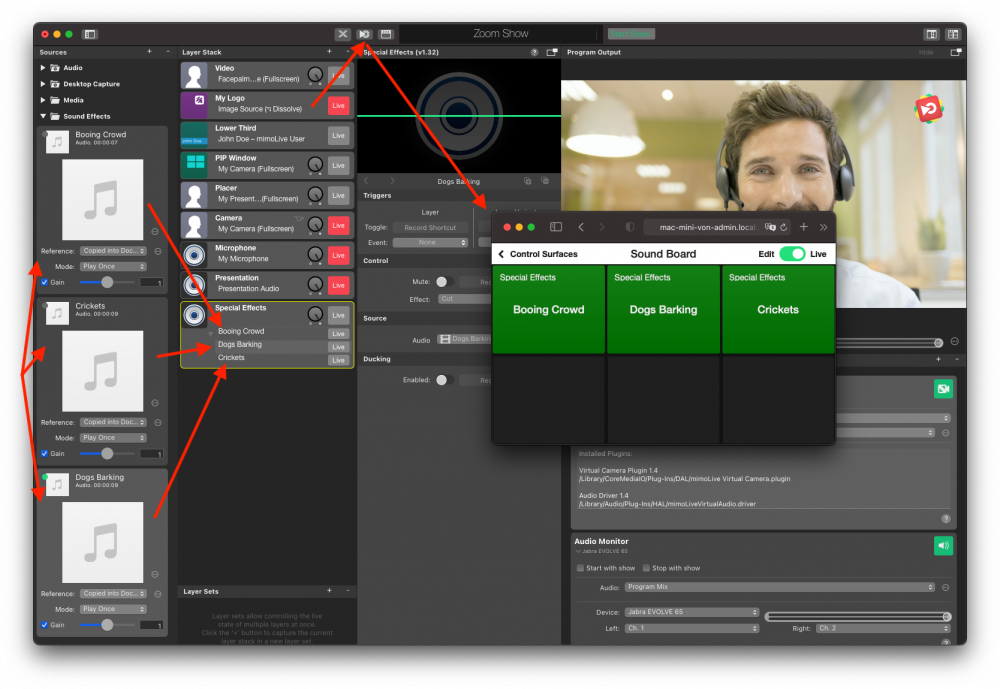
Creating a soundboard for special effects
It is a lot of fun to play audio into Zoom meetings, for example cheering, applause, booing and so on. mimoLive is great for making a soundboard:
- Get the sounds you want to use. (Tip: Garageband and iMovie come with a selection of audio effects you can easily use. To get find them, right-click on iMovie.app in your Applications folder, choose “Show Package Contents” and continue to navigate to Contents->Resources->iLife Sound Effects)
- Drag the audio files to the Source column to load them into your mimoLive documents.
- Create an Audio Only layer using Layer Variants for each of the sound effects.
- Set up a remote control surface with buttons for each of the sound effects.