
The Audio Source provides audio input from a microphone, a camera with an integrated microphone or some kind of audio interface that is connected to your Mac.
Bringing Audio into mimoLive
Audio devices can be connected to the Mac in several ways: USB, Thunderbolt, and FireWire. Some devices are even virtual devices that receive data over the network or aggregate audio from other audio devices or from other software.
Class Compliance
Audio devices can either be class-compliant or need a dedicated audio driver, usually provided by the manufacturer. Class-compliant devices are plug-and-play on the Mac and should work seamlessly. If you don’t see your audio device being available in mimoLive or experience issues with audio quality, please make sure you have the latest version of any additional software that came with your audio device installed.
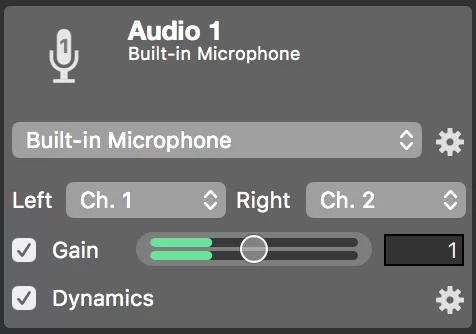
- Connect the audio device to your Mac. It should instantly become visible in the Audio Source device popup menu.
- Select the device from the popup menu. The input meter will display the volume levels of the incoming audio.
- Select the physical input channels that should be mapped to the left and right input channels in mimoLive.
Setting Up The Audio Device
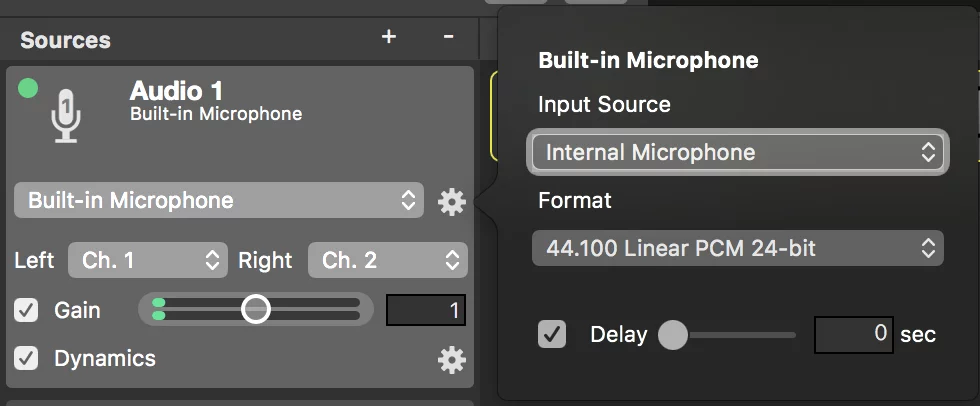
The action gear button next to the popup menu lets you configure the settings of the associated device.
- Input Source: Video devices with audio input may provide input ports like HDMI or SDI.
Configuring Hardware Channel Map
Audio interfaces usually make their various input connectors, like S/PDIF, TOSLINK, AES/EBU, MADI, etc., available through their channels. Channel mapping can be done directly on the device or via control software.
- Format: Audio devices usually provide more than one audio format. Select a format that matches the current mimoLive show. If such a format is unavailable mimoLive will convert the device’s audio input on the fly with a small performance penalty.
Configuring Hardware Audio Format
Some audio devices may require that the audio format, most notably the audio sampling rate, be set via their control software. Certain audio formats may only become available in mimoLive after changing the sampling rate in the device’s control software. Audio glitches may occur until the device’s control software has been configured to match the audio format selected in mimoLive.
- Delay: Oftentimes, audio input arrives ahead of video input. To compensate for the timing difference and to bring audio and video back into sync, audio input can be delayed by up to 2 seconds. The Audio Sync Meter Layer provides a workflow to determine the correct delay time.
Device settings are global
Note that the changes you make to the device settings affect all sources using this device.
Additional Settings
- Gain: In case the audio input is too quiet or easily distorts, its gain can be levelled using this control. The effect will immediately be visible in the volume meter. Gain changes can be temporarily disabled by unchecking the check box.
- Dynamics: The dynamics effect can be used to limit, compress, expand and excite the audio signal. The action gear button at the right opens the effect of the dynamic user interface. Dynamics can be temporarily disabled by unchecking the check box.

Dynamics are shared between sources with the same device input setup!
Sources sharing the same audio input device and the same channel map configuration also share their dynamics effect. Therefore, changes made to the effect of the dynamic in one of these sources affect all sharing sources. A label saying Shared! will be displayed nearby the dynamics section is affected sources.