
About the Call-In Show Template
This powerful template is designed to help you create engaging and interactive live video productions with ease. With the Call-In Show template, you can easily invite guests to join your show via video call, making it easy to incorporate interviews, discussions, and other types of live content into your broadcast.
In this mimoLive tutorial, we’ll walk you through the process of configuring the built-in Call-In Show template, from setting up your video call software to customizing the graphics and overlays for a seamless and professional-looking broadcast.
Whether you’re hosting a talk show, news program, or other type of live video production, the Call-In Show template is a powerful tool that can help you create engaging and interactive content that your viewers will love. So check out our mimoLive Call-In Show tutorial today and start exploring all the possibilities!
Prerequisite
Your guests will call in via mimoCall using their browser. Ideally, they should have a headset and a camera.
Log in into your Boinx Connect account for mimoCall
In order to use mimoCall, you need to set up a Boinx Connect Account in the mimoLive Preferences. Please read Boinx Connect for more information on how to create and login to your Boinx Connect Account. Your guests do not need a Boinx Connect account in order to join a mimoCall. Only the host needs that account to create the mimoCall.
Template Elements
Sources
- Camera Source (Video Source)
The Camera Source in mimoLive is a versatile input that supports a wide range of video and audio devices, from built-in webcams and USB capture dongles to professional HDMI and SDI interfaces. This section of the manual guides you through connecting and configuring video sources—including DSLRs, webcams, screen grabbers, and capture cards—to integrate live video into your production. - mimoCall Source
mimoCall on mimoLive allows remote guests to join your live stream for interviews or panel discussions. Set up a mimoCall source in mimoLive, share the URL with guests, and they can connect via their web browser. This feature ensures seamless integration of remote video and audio into your live production.
Layers
- Station Logo Layer
The Station Logo layer displays a branding image, such as a network or channel logo, on top of your video output. This ensures consistent branding throughout your show. The layer can be easily positioned, scaled, and faded in or out using various transitions. - News Crawl Layer
Whether you’re using it to share breaking news or additional information about your show, the News Crawler Layer is an essential element for any news or live production. With the ability to pull information from the internet, a local file, or text you type directly into your mimoLive document, you can easily customize your news crawler to fit your specific needs. - Split Screen Layer
The mimoLive Split Screen Layer allows you to create dynamic layouts for live broadcasts, showcasing multiple video sources simultaneously. This is perfect for interviews, panel discussions, and events where multiple perspectives or participants are needed on screen at once. - Audio Only Layer
The Audio Only layer injects audio input from any source thats provides audio, like an Audio Source, a Video Source, a Media File Source or a Media Playlist Source, into the program output.
Output Destinations
- Live streaming
Stream the program live on the Internet mimoLive lets you live stream to a great number of services that support the RTMP protocol. Adding a Live Streaming Output Destination Add a new Live Streaming Output Destination to your Output Destination list by clicking the + button on top of the list in the right most […] - Audio Aux Output
Send audio output to audio devices New documents created with mimoLive automatically add an Audio Aux Output Destination, named Audio Monitor, that allows you to route audio mixes to a specific audio output device. You can add additional Audio Aux Output Destinations to route any desired audio mix to the same audio output device using […]
Creating a new Document from the Call-In Show Template
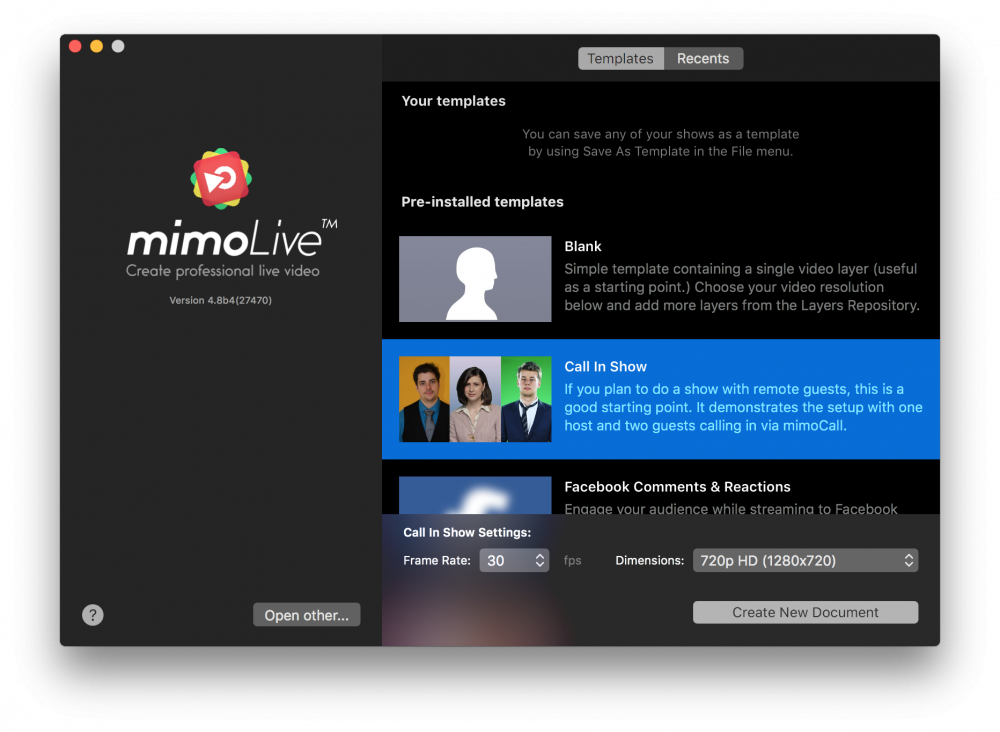
- Launch mimoLive. The New Document window will open up and let you select either a Template or choose from recently opened documents. If you don’t see the New Document window please choose “mimoLive > New…” in the main menu.
- Find the “Call In Show” template in the list of templates and select it. A sheet will open up at the bottom of the New Document window showing additional options.
- You need to specify the frame rate and the dimensions you want the video to be. It’s reasonable to go with 30fps and a 720p dimension.
- Click on the “Create New Document” button in the lower right corner. A new mimoLive document window will open up with lots of pre-configured layers.
Configuring the New Call-In Show Document
In order to make the document work you need to set up some things:
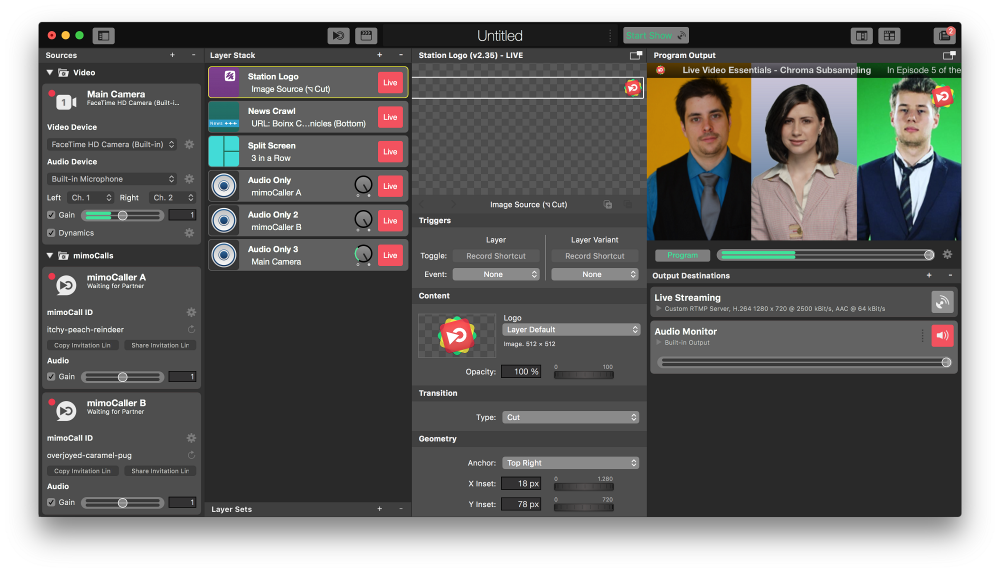
- Find the “mimoCaller A” and “B” in the Source Repository on the left. Make sure that they are active and after a couple of seconds their status below the source name label should read “Waiting for Partner”. If it doesn’t it probably is because you didn’t login into your Boinx Connect Account as described in the Prerequisite section.
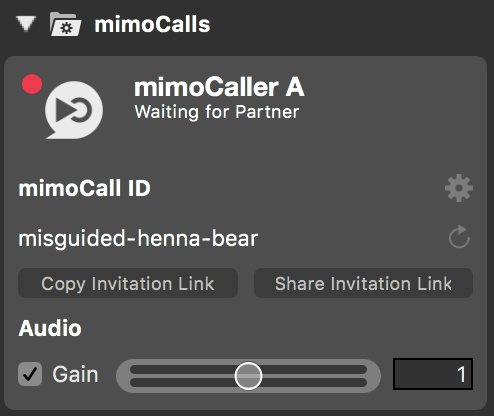
- To invite the guests you need to click the “Copy Invitation Link” button. This will put a web URL to the macOS Paste Board for you to pass it on by a medium of your choice (email, WhatsApp, etc.). The “Share Invitation Link” button will let you share the link via macOS sharing services.
- Once a guest will open the link with a supported web browser they will appear in your show.
- Select the “Split Screen” layer in the Layer Stack. The Layer Settings panel right next to it will show all parameters for this layer.
- Enter the names of the host and the guests in the text fields “Content > Source Name A, B, and C”
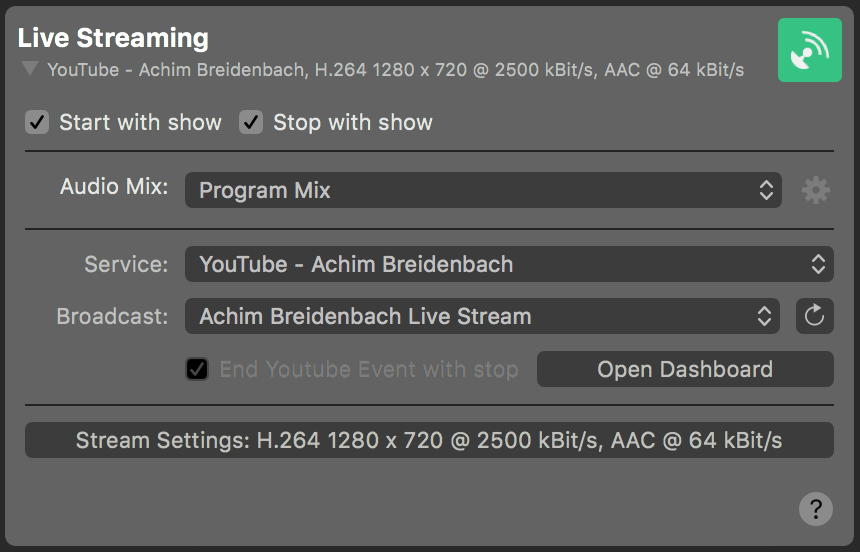
- Find the Live Streaming Output Destination on the far right.
- Setup a Streaming Destination like your Facebook Timeline or your YouTube channel. Please refer to Live Streaming for details. Make sure that the Live button is green.
- Find the Audio Monitor Output Destination below the Live Streaming Setup.
- Select the audio hardware where you want to hear the guest’s audio. Consider using headphones as this helps to reduce echo and echo cancellation noises.
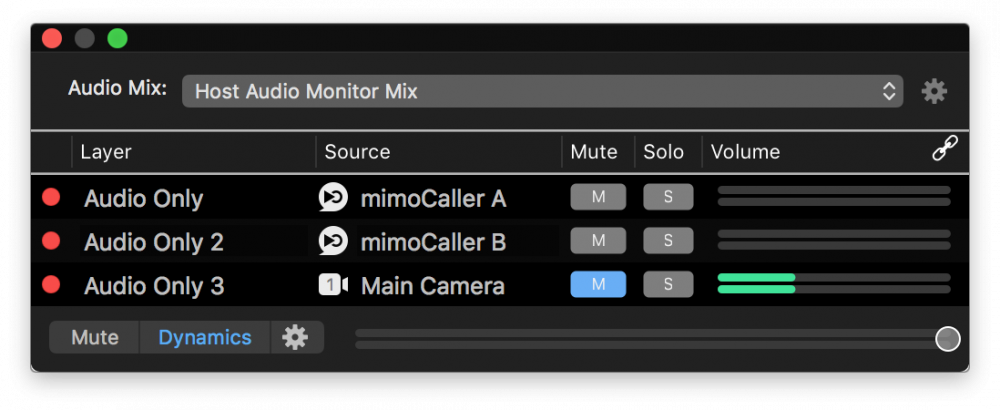
- Please note that the Audio Monitor Output Destination is set up that way that you won’t hear yourself as this echo confuses most people. This is done by a special Audio Mix that has a mix-minus with the host audio. You can check this Audio Mix in the Audio Mix Panel accessible through the Windows menu. As you can see the Main Camera audio is muted:
Streaming a Call-In Show
Now everything should be set up for your first Call-In Show to be streamed to the internet.
- Click on the Remote Control Surface Button on the left side of the document info box on top of the mimoLive window. This will open a browser window with the Remote Control Surface already configured for this template.
- On this remote control surface you can see all 3 video sources and “Solo” buttons to make each of them displayed in fullscreen mode if a guest is speaking for a longer time.
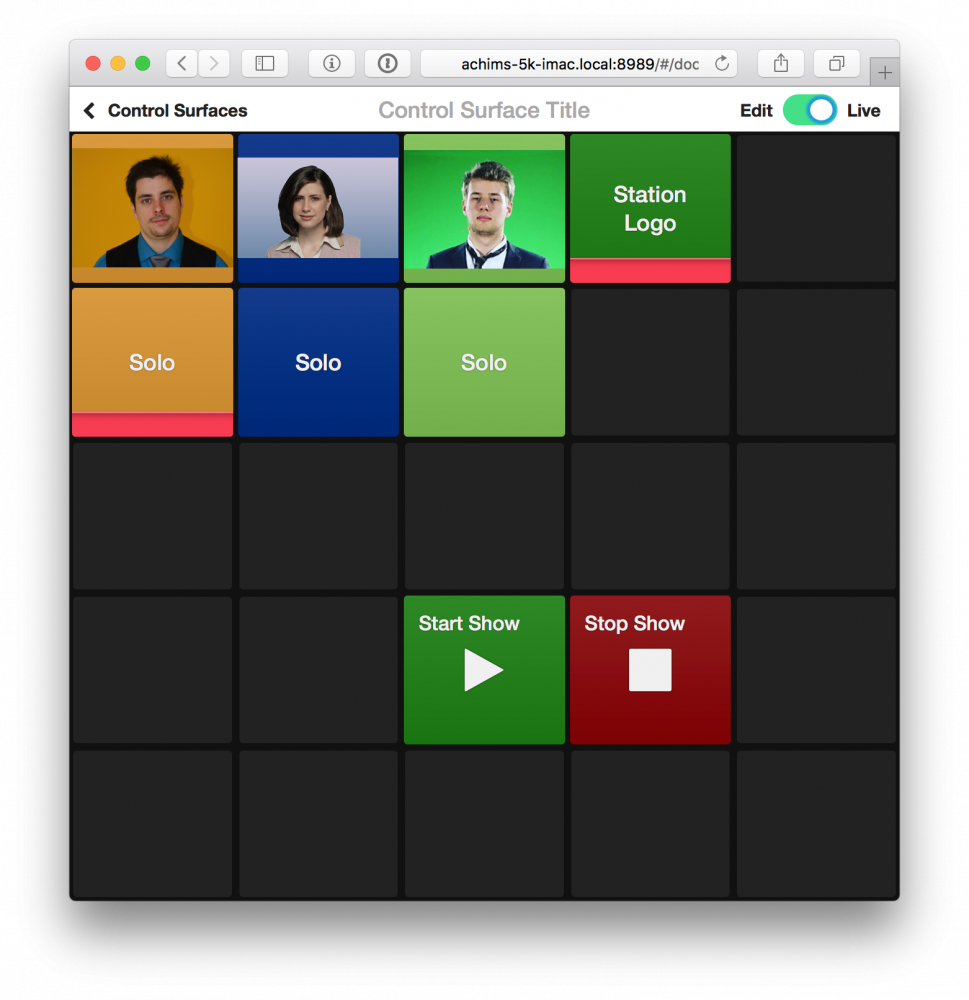
- Put the host (yourself) on “Solo” so you can begin with an introduction.
- Once everything and everyone is ready click on the “Start Show” button on the Remote Control surface. Check if the Live Streaming Output destination in the mimoLive document window is actually streaming.
- After your introduction you can “un-solo” yourself to reveal the other guests on the panel.
- If a guest talks about a topic for a longer time you can put them full screen with the Solo button below their preview.
- Once your show is over you need to click the “Stop Show” button in the Remote Control or on top of the mimoLive document window.
Stopping the show may end your live stream immediately
Your live stream usually has a delay of 10 to 20 seconds between you creating it and the audience seeing it. This is due to video buffers at the streaming services. Unfortunately, some streaming services shut down the live stream immediately once you close your stream so that the audience won’t see the lasting 10 to 20 seconds buffered video. It makes sense to close the event with an outro of any kind (e.g. fade to black), mute the audio and wait 20 seconds before shutting down the live stream.