About the Video Switcher Template
The Video Switcher Template enables seamless switching between up to 9 video sources during your production. It’s designed for maximum flexibility and ease of use, especially in live scenarios.
Key Features:
- Multiview Monitoring: Watch all 9 sources at once using a Multiview display, ideal for keeping track of inputs. This can be shown on a separate screen for easy monitoring.
- NDI® Output: Output your program feed over the local network via NDI, making integration into professional workflows smooth and efficient.
- Remote Control Surface: Operate the switcher from a touchscreen device using mimoLive’s Remote Control Surface, giving you intuitive and mobile control over your live switch.
Because the Video Switcher focuses solely on switching video, using an Audio Only Layer ensures consistent and centralized audio, especially in professional setups where an external audio mixer handles all microphones and sound sources.
This setup is perfect for live streaming, event production, or studio-based broadcasts where source switching and visibility are essential.
Template Elements
Sources
- Camera Source (Video Source)
The Camera Source in mimoLive is a versatile input that supports a wide range of video and audio devices, from built-in webcams and USB capture dongles to professional HDMI and SDI interfaces. This section of the manual guides you through connecting and configuring video sources—including DSLRs, webcams, screen grabbers, and capture cards—to integrate live video into your production. - Audio Source
The Audio Source provides audio input from a microphone, a camera with an integrated microphone or some kind of audio interface that is connected to your Mac. Bringing Audio into mimoLive Audio devices can be connected to the Mac in several ways: USB, Thunderbolt, and FireWire. Some devices are even virtual devices that receive data […]
Layers
- Video Switcher Layer
The Video Switcher layer in mimoLive is a powerful tool that allows you to easily switch between up to 9 different video sources with smooth cut or dissolve transitions. One of the great benefits of this layer is that it can seamlessly transition between sources with different pixel resolutions or different FPS (frames per second). - Placer Layer
When starting with mimoLive®, the first tool you should familiarize yourself with is the Placer Layer. This basic yet pivotal layer is the cornerstone of creating visually engaging and professionally structured broadcasts. In this guide, we will explore why the Placer Layer is foundational, its capabilities, and how it enhances your video production process. The Placer Layer is the most basic representation of your footage in the layer stack. It enables you to perform basic edits to the appearance. - Audio Only Layer
The Audio Only layer injects audio input from any source thats provides audio, like an Audio Source, a Video Source, a Media File Source or a Media Playlist Source, into the program output.
Output Destinations
- NDI® Output
The NDI® Output Destination sends video data to any NDI® receiver on your local network. NDI® also transports the alpha channel which gives you the opportunity to use mimoLive as a graphics generator in NDI® enabled environments. Adding a NDI® Output Destination Add a new NDI® Output Destination to your Output Destination list by clicking […] - Audio Aux Output
Send audio output to audio devices New documents created with mimoLive automatically add an Audio Aux Output Destination, named Audio Monitor, that allows you to route audio mixes to a specific audio output device. You can add additional Audio Aux Output Destinations to route any desired audio mix to the same audio output device using […]
Adapting the Video Switcher Template to Your Needs
To customize the Video Switcher Template for your specific setup, follow these steps:
- Inspect Camera Sources
Review all sources labeled “Camera 1” through “Camera 9” in the Sources panel. - Assign Video Devices
For each source, click the “Video Device” popup menu and choose the appropriate input device from the list. - Verify Input Preview
Ensure that each selected device displays a live preview in the Video Switcher layer preview confirming the connection.
You can show or hide the content panel of any source by simply double-clicking the empty space inside its tile. This is helpful to keep your workspace clean and focused.

he Video Switcher Layer is designed for flexible video switching but does not route audio from the camera sources to the program output by default. Instead, you’ll need to configure a dedicated Audio Only layer to handle the sound from your external audio mixer board.
- Plug the main output of your audio mixer board into an available audio input device connected to your Mac (e.g., via USB audio interface).
- Look for the existing “Audio Mixer” item.
- Choose the correct input device from the Audio Device dropdown menu (this should match your mixer’s connected interface).
Controlling the Video Switcher layer
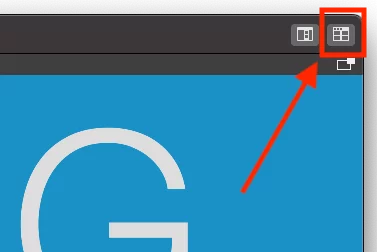
Switching via Multiview
This template usetelize the external Multiview of mimoLive which you can put on an external screen if available. To open the Multiview, find the Multiview button in the upper right corner of the mimoLive document window and click on it:
The external Multiview will open. Now you can position it on the secondary monitor if you want to and click the green button in the upper left corner of the window to make it full screen.
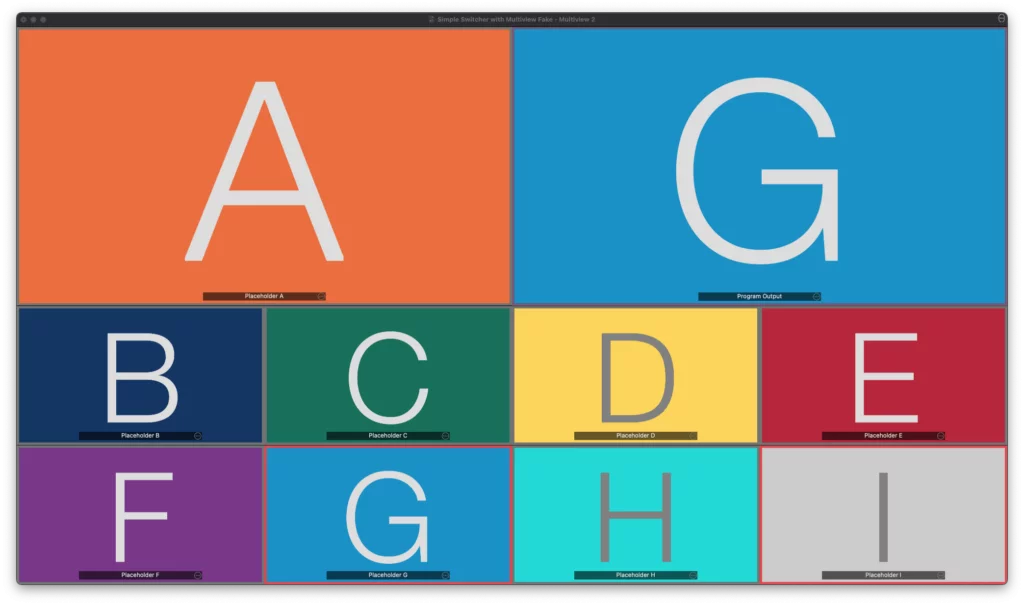
Now you can click on the video previews to initialte a cut to this video source. The telly light will be refelcted in the boarder of the video source. it will turn red if the video switcher switched to it.
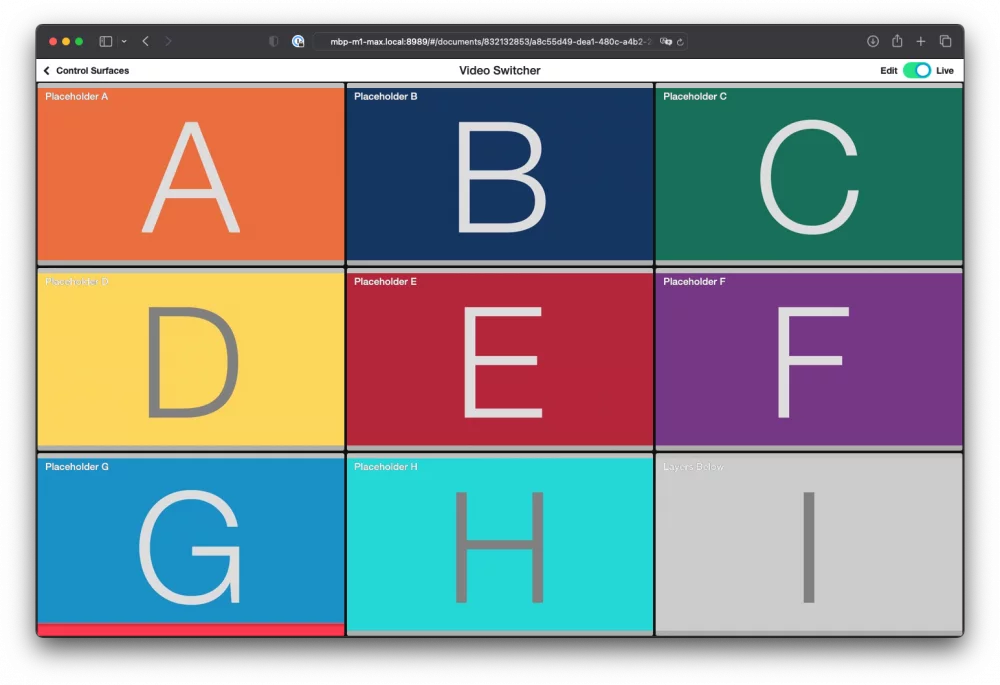
Switching via Remote Control Surface
Controlling the Video Switcher layer is easier via the Remote Control Surface. This template got a predefined Remote Control Surface to get you started quickly. As the Remote Control Surface is basically a web page, it works on an iPad, an iPhone, a webbrower on a laptop or a tablet.
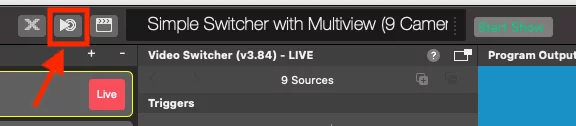
Find the “Open Remote Control Surface” button on the left of the HUD on top of the mimoLive document window to open it:
Enable the Remote Control Surface in the mimoLive Settings.
When you use the Remote Control Surface the first time, you’re asked to go to the mimoLive Settings and enable it.
The Remote Control Surface included with the Video Switcher with Muliview template lets you control the switcher remotely: