
In mimoLive, layers hold every ingredient of the final video composition. The concept is taken from how we create real-world photo collages and work in the same way. The lowest layer is in the very background, the highest layer is in the foreground of the composition. The overall final video output is called the program out.
mimoLive has lots of different types of layers. Please refer to the Layer Library for a list of available layers.
The Layer Stack
The layer stack in mimoLive is the area of the document window which holds all layers of the project.
Layers
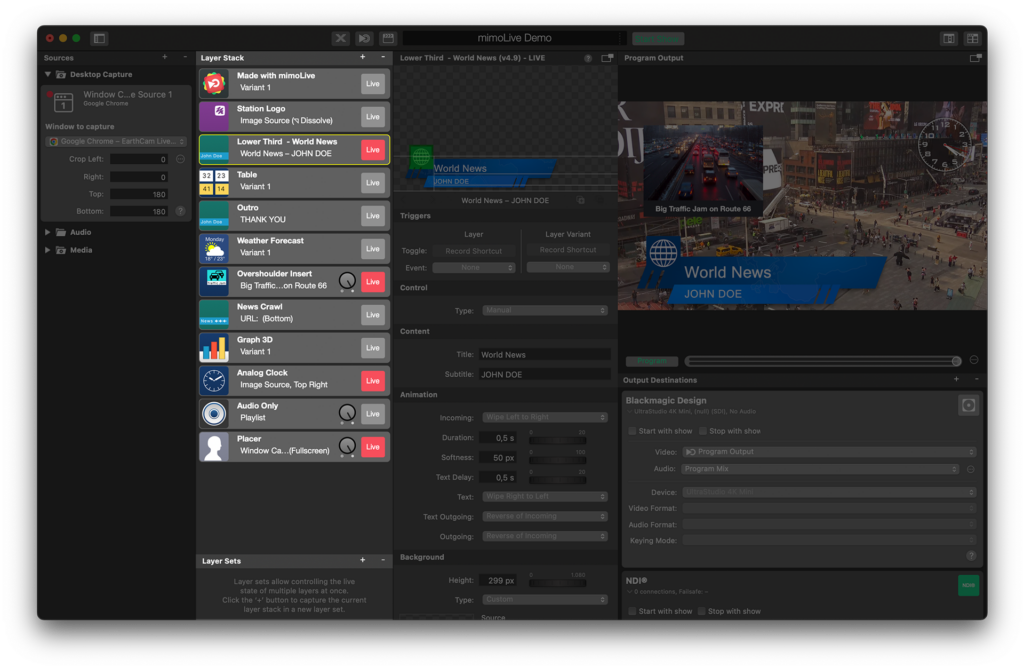
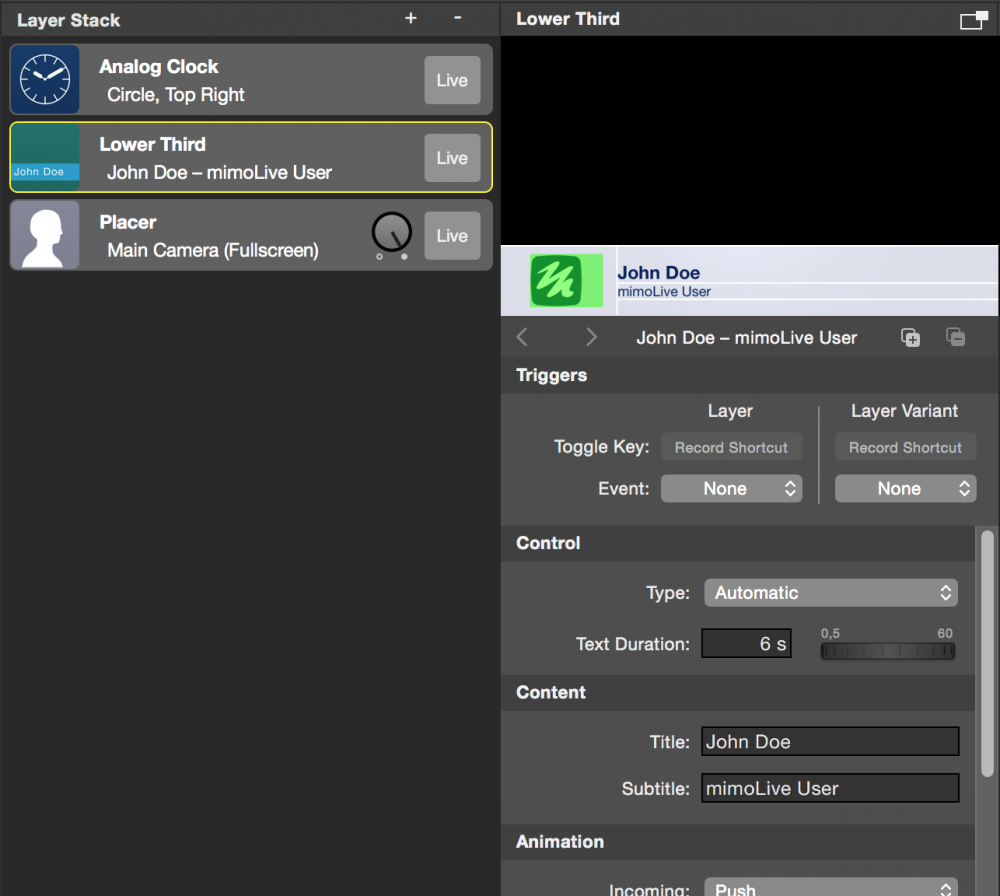
Example of Layers in mimoLive
In this example, there are three layers used. The Background layer, a Placer layer containing the speaker video and a Lower Third layer which contains name and title information.
 layer")
Adding A New Layer To The Layer Stack
There are three ways to add a new layer to the layer stack:
- Drag a source from the Sources Repository to the layer stack.
In the case of a visual source, you will get a preconfigured Placer layer which displays the source in full-screen mode.
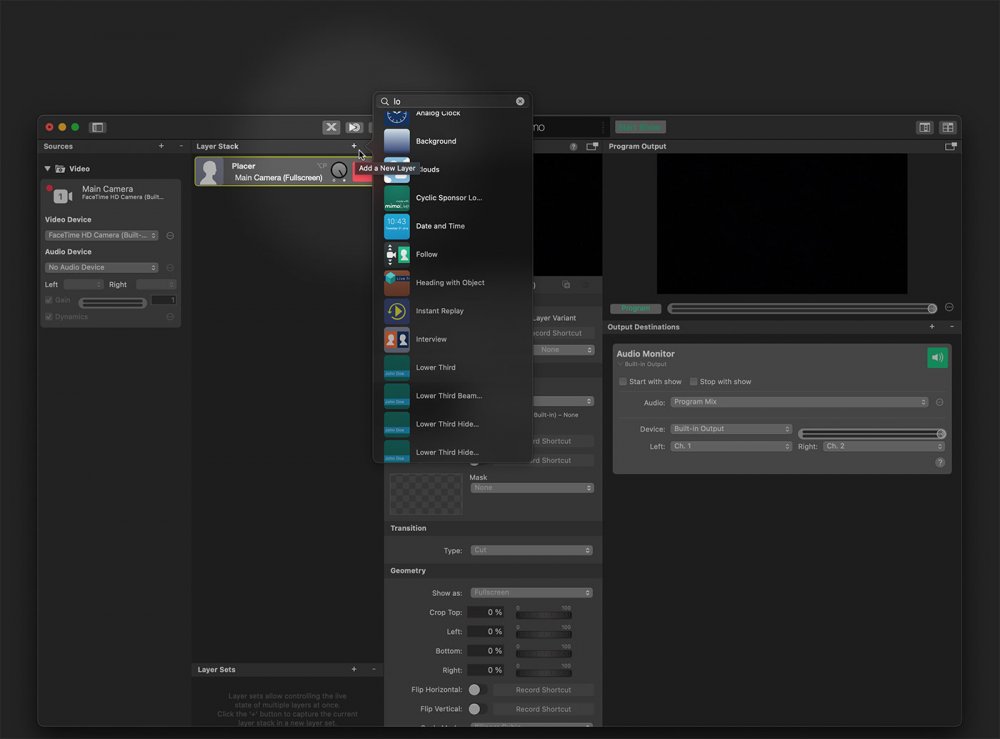
In the case of an Audio source, you will get an Audio Only layer. - Click on the “+” button on the top right of the layer stack to open the Layer Templates Library. Find your layer and drag it to the layer stack at the position you want the layer to be.
- Click on the “+” button on the top right of the layer stack to open the Layer Templates Library. In the Layer Templates Library double click on the Layer Template you want to add. The new layer will be added on top of the currently selected layer. You may need to reorder the layer position within the layer stack to meet your needs.
Reordering Layers in the Layer Stack
Because it is important at which position a layer is placed in the layer stack you may need to reorder the layer e.g. to bring a background behind a transparent (chroma keyed) video source.
To reorder the layers in the layer stack simply drag the layer to the new position in the layer stack.
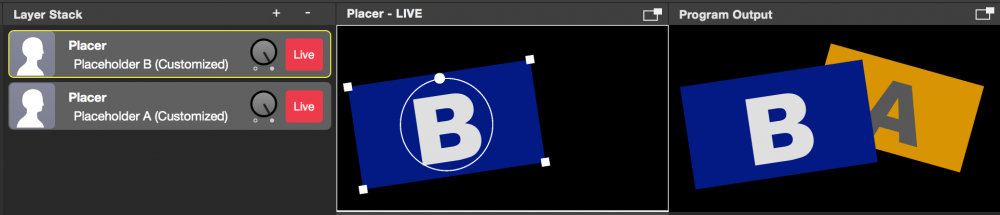
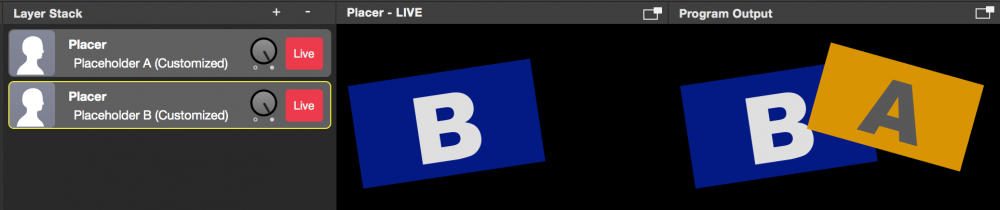
Dragging the top layer (Placer layer with placeholder “B”) to the bottom brings it behind the placeholder “A” in the Program Output.
Removing A Layer From The Layer Stack
Layers can be deleted in two ways.
- Select the layer
- Click on the “-” button on top of the layer stack to remove it permanently.
Or:
- Seelect the layer
- Hit “cmd” ⌘ + “backspace” on your keyboard at the same time.
Copy/Paste Layers
Layers can be copied and pasted between mimoLive documents, as well as dragged and dropped. For example, if you’ve created a specific design for a Lower Third layer in one mimoLive document (or found one of your interest in the Lower Third Playground template), you can select it, press ⌘-C, switch to another document, select a layer, and press ⌘-V to insert the copied layer above the selected one. Alternatively, you can simply drag the layer from one document to another.
Take a Close Look at Sources Associated with the Layer!
Media files associated with the copied layer will be transferred to the destination document. However, other source types will not be copied automatically—you’ll need to manually create those sources in the destination document and reconnect them to the pasted layer.
Layer Variants
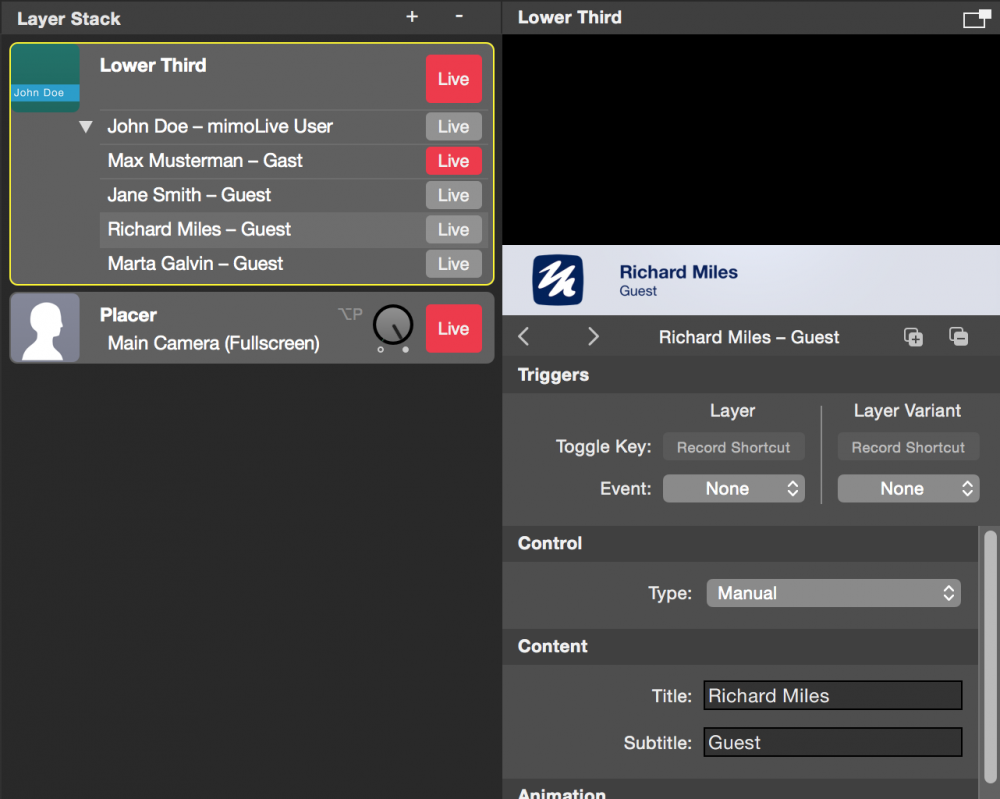
Variants store sets of settings. For example, instead of having five individual Lower Third layers with a different name each, you can have one Lower Third layer with five Variants.
Why Use Layer Variants?
- Mutual Exclusivity: Layer Variants cannot be active at the same time. This ensures that only one version of the layer (e.g. a Lower Third) is shown in the program output at a time, preventing visual clutter or accidental overlap.
- Smooth Transitions: Some layers support animated transitions between variants. For example, the PIP Window layer animates the position of the window when switching from one variant to another, creating a smooth, professional-looking transition.
Each variant can have its own keyboard shortcut trigger or button in the Remote Control Surface.
Please note that there are different information to see in the variants list:
- The little “Live” button (below the big “Live” button) can be used to switch a certain variant live. If another variant is currently live this variant will be switched off (some layer has a transition between variants, most don’t)
- The little “Live” button indicates with red that this variant is currently live. This information is independent of the select state of a variant!
- The light grey background indicates that this variant is currently selected for preview on the right. This is independent of the live state of a variant!
The selected variant doesn’t need to be the live variant! If the output doesn’t show what the previews show it’s most likely because you selected a different variant than the live one.
Adding Variants To A Layer
To add a Variant to a layer, follow these steps:
- Select the layer you want to add a Variant to in the layer stack. A preview of the layer will appear on the right
- Click the “+” button at the top of the preview settings. This will create a new Variant by duplicating the currently selected one.
- If you want to duplicate a specific Variant, select it first from the list of Variants in the layer stack before clicking the “+” button.
Design First, Duplicate Later
Since the settings of Variants are independent of one another, it’s a good idea to finalize the visual design of a layer before creating multiple Variants. For example, first design the graphical appearance of a Lower Third, then duplicate it into multiple Variants and update each with different titles and subtitles. However you can copy and paste specific parameters later on if necessary.
Collapsing Variants In The Layer Stack
If you have many Variants and want to reduce visual clutter in the layer stack, you can collapse the list of Variants for a particular layer. To do this, click the white triangle to the left of the Variants list in the layer stack.
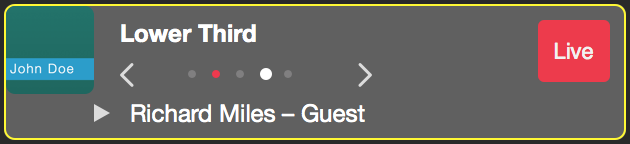
Understanding the Variant Indicators
- A white dot marks the currently selected Variant. This is the Variant that will go live when you press the layer’s Live button.
- A red dot indicates the currently live Variant.
ou can navigate through Variants using the arrow buttons next to the dot indicators, or click directly on a dot to instantly select a specific Variant.
Step Through Variants During Live Shows
The ability to step through Variants is especially useful when you have a predefined sequence to follow during a show. For example, if you’re hosting a show with several guests appearing one after another, you can prepare a set of Lower Third Variants in advance—each with the name and title of a guest in the correct order. During the show, you simply step through the Variants one by one as each guest appears.
Renaming Variants
By default, Variants are automatically named based on the behavior of the layer. However, you may want to rename a Variant to something more meaningful for your production workflow.
To rename a Variant, you can:
- Double-click on the Variant’s name to edit it directly in place.
- Right-click on the Variant’s name to open the context menu, then select “Rename Layer Variant” to enter name edit mode.
Giving your Variants descriptive names helps keep your project organized and makes switching between them during a live show easier.
Removing Variants From A Layer
To remove a Variant from a layer, follow these simple steps:
- Select the Variant you want to remove from the Variant list in the layer stack. The preview for that Variant will appear on the right.
- Click the “–” button at the top of the preview settings to delete the selected Variant.
Editing Layer Settings
Each layer type in mimoLive has its own unique set of parameters, known as layer settings. To edit these settings, select the desired layer in the layer stack. A preview of the layer will appear to the right of the layer stack, and the corresponding settings will be displayed below the preview image.
Scroll down to view and adjust all available parameters.
Common Layer Settings
All the layers have certain settings in common. The Event Triggers are described in the Start/Stop Show Button section.
Individual Layer Settings
Many layers in mimoLive support direct manipulation, allowing you to interact with elements or guides directly in the preview area. When you adjust elements this way, the corresponding values in the settings panel below the preview will update automatically.
However, not all settings can be modified through the preview. For example, attributes such as color, font face, font size, and overall behavior settings must be adjusted in the settings panel.
To make the most of each layer’s capabilities, it’s recommended to explore all available settings and experiment with different configurations.
Copy and Pasting Layer Attributes
If you have multiple layers of the same type in your layer stack, you can quickly transfer all settings from one layer to another using the following steps:
- Right-click on the source layer in the layer stack to open its context menu.
- Select “Copy Layer Attributes.” The parameters of this layer will be copied to the clipboard.
- Right-click on the destination layer to open its context menu.
- Choose either:
- “Paste Layer Attributes” to apply the copied settings to the currently active Variant of the destination layer, or
- “Paste Attributes to All Layer Variants” to apply the copied settings to all Variants of the destination layer.
This is especially useful when you want to maintain a consistent design or behavior across multiple similar layers.
All Layer Attributes Will Be Overwritten
lease note that using this method will override all parameters in the destination layer. This includes any manual changes you’ve made—such as the name and subtitle in a Lower Third layer, for example. Make sure to double-check whether you want to preserve any custom edits before pasting layer attributes. (see box below)
Edit or Remove Attributes Before Pasting
Layer attributes are copied to the pasteboard as XML-formatted text, which makes it easy to review, modify, or remove values using a text editor.
Before pasting to another layer, you can:
- Change values directly in the XML.
- Delete specific parameters to avoid overwriting existing content in the destination layer.
For example, to prevent overwriting the Title and Subtitle of a Lower Third, look for and remove the following lines:
<key>tvGroup_Content__Title</key>
<string>John Doe</string>
<key>tvGroup_Content__Subtitle</key>
<string>mimoLive User</string>
By doing this, the destination layer’s title and subtitle will remain unchanged when you paste the attributes.
Copying and Pasting Parameter Groups Only
If you don’t want to copy an entire layer’s attributes—especially to avoid overwriting important entries like the Title and Subtitle in Lower Thirds—you can narrow the copy-paste process to a specific parameter group.
- Right-click on the parameter group bar in the layer’s settings to open its context menu.
- Select “Copy [Group Name] Attributes.” This copies only the settings from that specific group to the clipboard.
- To paste the values:
- Right-click on the same group in the destination layer.
- Choose one of the following options:
- “Paste [Group Name] Attributes” – applies the copied values to the currently selected Variant only.
- “Paste [Group Name] Attributes to All Variants” – applies the values to all Variants of the destination layer.
This method gives you precise control over what gets copied and avoids unintended changes.