Prerequisites
– Open the document you want to manipulate in mimoLive.
– Make sure the document is in a finished state so that the API endpoints like Layers do not change anymore. Please be aware that if you remove a layer and add it again this layer will have a different Layer ID when talking to it via the API. However, reordering layers or adding layer variants won’t change the layer ID.
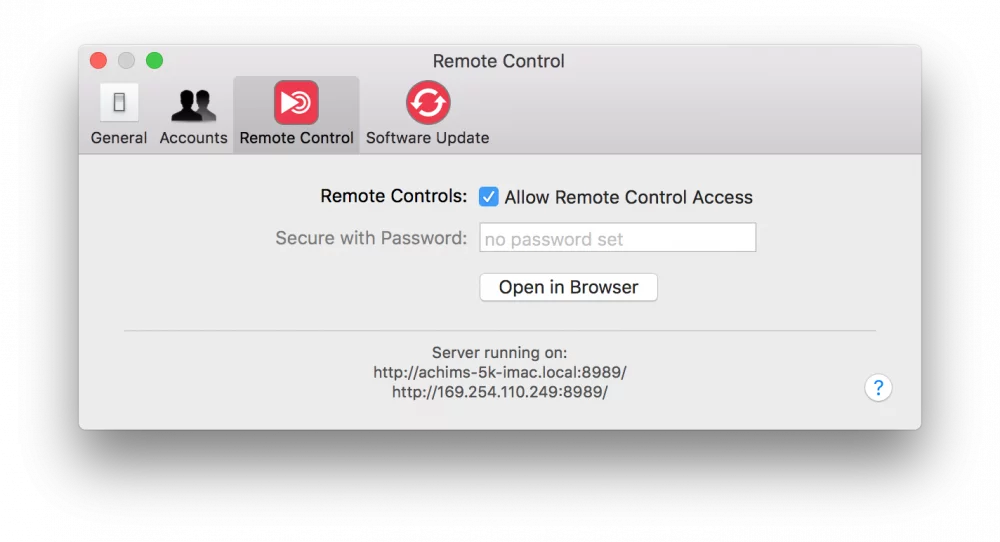
– Enable the HTTP-Server in mimoLive Remote Control Preferences. Check the “Allow Remote Control Access” option:

Please note the IP Number or IP address with the port number of mimoLive for further use when working with the HTTP API.
Ways of Controlling mimoLive Remotely
Controlling mimoLive with Remote Control Surfaces
The most effective way is to create a custom Remote Control Surface for your mimoLive document, which can run on an iPad, iPhone, or any other device with an internet browser.
Controlling mimoLive with php
We have a well-documented sample PHP script on GitHub:
https://github.com/boinx/mimoLive-HTTP-Demo
Controlling mimoLive with CURL
To control mimoLive via HTTP you can use the bash command “curl”. For the curl commands to work you need to find the ID of the mimoLive document you want to manipulate.
Controlling mimoLive with Automation layer
The Automation layer can perform some easy commands to trigger actions in mimLive by their API Endpoints. It also has an httpRequest() command to perform any kind of GET request actions the HTTP API is capable of.
Controlling mimoLive with Apple Script
Currently mimoLive doesn’t natively support Apple Script. However, you can use a workaround to reach out to mimoLive: There is a “do shell script” command in apple script that let you perform bash commands like “curl”. The previous section explains how to create a curl command to manipulate a certain layer or layer value.
Pitfalls in Apple Script
In Apple Script there are two pitfalls when bringing a terminal command like “curl” over to the do shell script command: 1. All “ needs to be prefixed with a \ in order to let the Apple-Script parser know that those are not the end markers for the do shell script command. The \ is an escape character to tell the parser to ignore the following character. 2. If you concatenate multiple text parts with & then this is a “list of text” to Apple Script rather than a single text. The do shell command won’t work with “list of text” and therefore your need to convert it back to a single text with the “as text” at the end of your curl command text
Once you are satisfied with your curl command you need to wrap it in a “do shell script” command in Apple Script:
Please make sure to replace xxxxxxxxx with your specific layer API Endpoint!
set layerAPIEndpoint to "xxxxxxxxx" -- in our example this would be "http://172.28.30.202:8989/api/v1/documents/458706932/layers/BA868701-8131-49CB-8EDD-8C7E6E7CD60B"

set lowerThirdTitle to "Hello World!"
do shell script "curl -d '{\"input-values\":{\"tvGroup_Content__Title\":\"" & lowerThirdTitle & "\"}}' -H \"Content-Type: application/json\" -X PUT \"" & layerAPIEndpoint & "\"" as text
The following example Apple script shows how to switch on a layer every half an hour on the hour: This is could be useful for commercial overlays. Make sure to use a layer that will switch itself off after a certain time (e.g. a Placer Layer with a non-looping movie source will do so).
Please make sure to replace xxxxxxxxx with your specific layer API Endpoint!
-- configure your Layer API Endpoint:
set layerAPIEndpoint to "xxxxxxxxx" -- in our example this would be "http://172.28.30.202:8989/api/v1/documents/458706932/layers/BA868701-8131-49CB-8EDD-8C7E6E7CD60B"
-- repeat endlessly:
repeat
	-- get the seconds last in this hour
	set currentDate to current date
	set secondsToNextHour to 3600 - ((minutes of currentDate) * 60 + (seconds of currentDate))
	-- --------------------------------------------
	-- The following code snippet is useful only if you want to
	-- switch the layer live on half hours also.
	-- if you don't want this behaviour you can delete this part.
	-- --------------------------------------------
	-- check if we are currently in the first half of the hour
	if secondsToNextHour > 1800 then
		-- yes, we are in the first half of the hour, so only wait half the time
		set secondsToNextHour to secondsToNextHour - 1800
	end if
	-- --------------------------------------------
	-- wait until the time to trigger the layer
	delay secondsToNextHour
	-- set the specified layer to live:
	do shell script "curl \"" & layerAPIEndpoint & "/setLive\"" as text
	-- wait a couple of seconds to make sure we don't glitch in time
	delay 5
end repeat
Controlling User Interface Elements in mimoLive
Getting an API Endpoint
API endpoints are essential for addressing specific elements in your mimoLive document. For a list of available API endpoints, please refer to API Endpoints.
Before mimoLive 5.5 it was hard to get the Document ID and e.g. a Layer ID with Terminal commands looking through long JSON data. Since mimoLive 5.5 it is much easier:
First of all copy the mimoLive HTTP server base URL from the Remote Control section of the mimoLive Preference window (see screenshot above). Open a text editor (e.g. TextEdit by Apple) and paste the Clipboard content into a newly created text document. Please make sure, that there is no backslash at the end of the URL! The result should look like this:
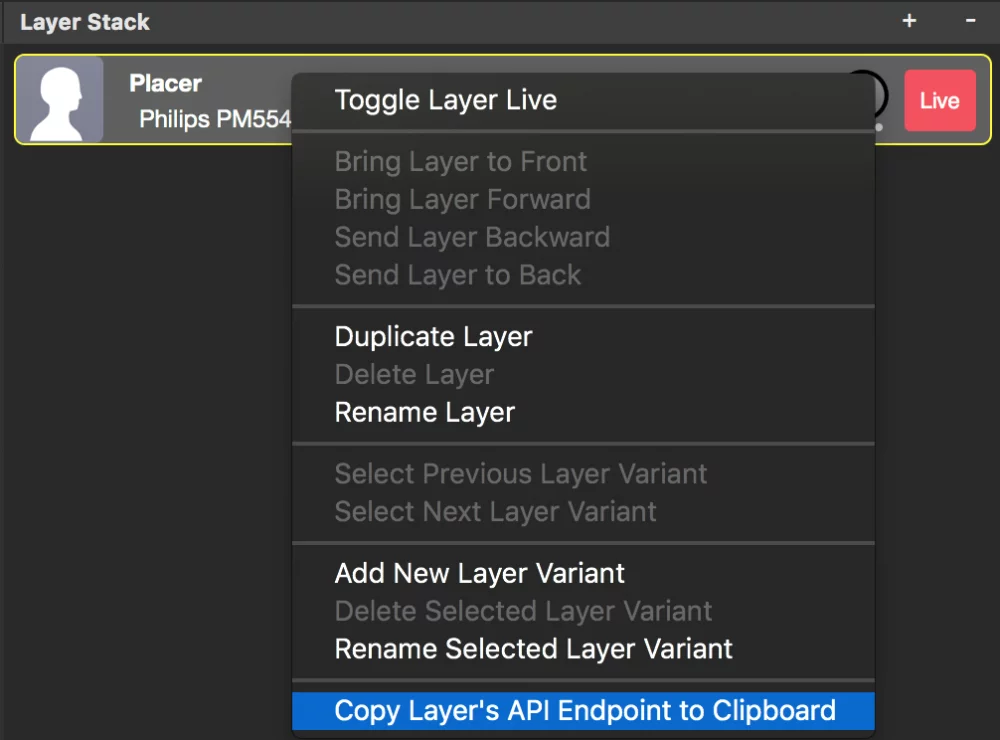
http://172.28.30.202:8989In the mimoLive document window with your mouse, you can right-click (or control-click, or two-finger-click) on the object of interest (e.g. a Layer, a Source, a button of a Layer control) to get a context menu. There is one menu item that let you copy the API Endpoint to the macOS Clipboard for using it in your mimoLive API project.

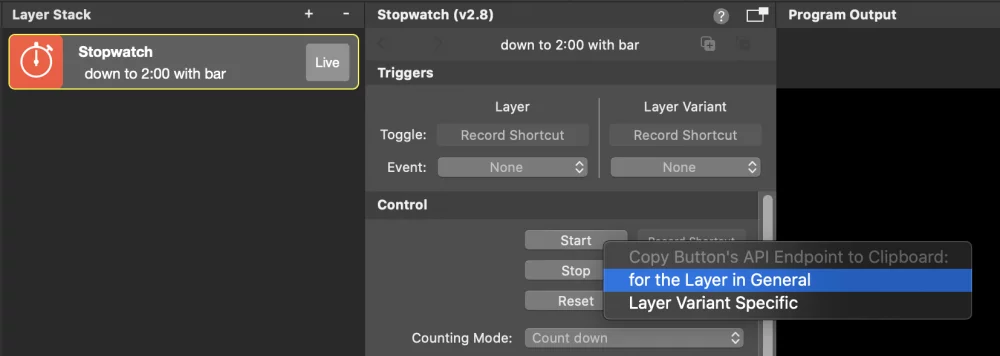
Sometime it’s important to address a specific layer variant rather than the layer in general. If you right-click on a layer’s parameter you will see that there are different API endpoints for either the current live layer or the specific layer variant:

Go back to your text editor and paste the just copied API Endpoint after the HTTP Server base URL. Now the URL in your text browser should look like this:
http://172.28.30.202:8989/api/v1/documents/458706932/layers/BA868701-8131-49CB-8EDD-8C7E6E7CD60BThis is the final API Endpoint to address a layer in your document. In this example 458706932 is the document ID and BA868701-8131-49CB-8EDD-8C7E6E7CD60B is the specific layer ID of a certain layer in this document.
Right-clicking on certain user interface elements to reveal a context menu for obtaining the specific API endpoint works for the following:
- Sources
- Layers
- Layer Variants
- Layer Parameter
- Output Destinations
- Layer Sets

Example: Switching ON and OFF a Layer
With the retrieved API Endpoint for a certain layer you can toggle it on and off with the following terminal commands.
Please make sure to replace xxxxxxxxx with the API Endpoint from the previous step!
curl xxxxxxxxx/setLive
curl xxxxxxxxx/setOff
curl xxxxxxxxx/toggleLive
# our example will look like this:
curl http://172.28.30.202:8989/api/v1/documents/458706932/layers/BA868701-8131-49CB-8EDD-8C7E6E7CD60B/setLiveThe URLs also work in an Internet browser
Those URLs (without the “curl” command) can be put into the address bar of an Internet browser also. Once you hit return the browser will call the mimoLive HTTP server and perform the command you specified. If you have JSON data that you need to send to the API endpoint you can add this to the URL as well, see “Converting a CURL command with JSON Data To an HTTP URL for simple HTTP Requests” below.
An easy way to get the complete HTTP URL to switch a layer’s live state to on or off is by right-clicking on the layer’s Live button to reveal a context menu and selecting ‘Copy URL To Set Layer Live’. This will copy the URL to the clipboard for your use. In the screenshot, you can see the context menu for the Live button of a Lower Third layer.

Example: Changing a Value of a Layer
– All the parameters of a layer can be set via the HTTP API. You need to find the correct key in order to set a new value. In our example, we will set the Title of a Lower Third Layer with the key tvGroup_Content__Title. Because we need to send the new value in a JSON file to the HTTP server with a PUT request the curl command gets a bit crowded.
*Please make sure to replace xxxxxxxxx with your specific layer API Endpoint!
curl -d '{"input-values":{"tvGroup_Content__Title":"My new title"}}' -H "Content-Type: application/json" -X PUT "xxxxxxxxx"
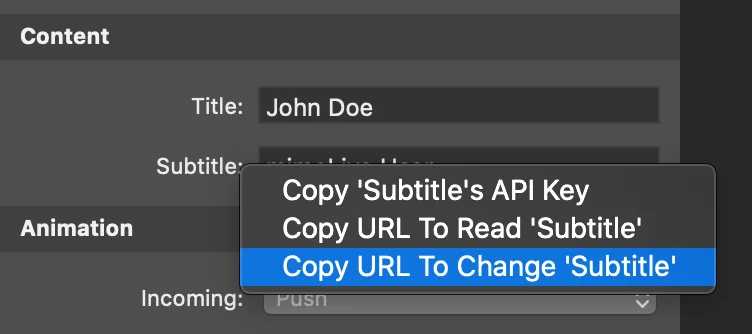
A quick way to get a complete HTTP URL to trigger the update of a layer property is to right-click on the property’s name, revealing a context menu, and select “Copy URL To Change ‘…..’ ” This menu command copies an HTTP URL to the clipboard, which, when called (e.g., in an Internet browser), will set the property to its current value. By examining the URL, you can determine which part of it needs to be modified to send your own data to this property. In the screenshot, you can see the context menu for copying the URL to change the subtitle of a Lower Third layer.

http://127.0.0.1:8989/api/v1/documents/xxxxxxxxxxxx/layers/yyyyyyyyyyyy/variants/zzzzzzzzzzzz?include=data.attributes.input-values&fields[input-values]=tvGroup_Content__Subtitle&update=%7B%22input-values%22:%7B%22tvGroup_Content__Subtitle%22:%22mimoLive%20User%22%7D%7DThe new value in the URL must be URL encoded!
In this example the space between “mimoLive” and “User” is encoded as %20
Best Practices
Collection of Useful API Commands for you to explore
Setting the RTMP URL and Streaming Key of a Live Streaming Output Destination:
curl --data '{"data": { "attributes": {"settings": {"rtmpurl":"rtmp://mystreaminghost.com", "streamingkey":"MYTOTALLYSECRETSTREAMKEY"} } } }' --request PATCH http://192.168.0.100:8989/api/v1/documents/xxxxxxxxx/output-destinations/yyyyyyyyyyyyySetting the File Name and Path of a File Writer Output Destination
curl --data '{"data": { "attributes": {"settings": { "location": "~/Destktop/Recordings", "filename": "MyGreatShow %year-%month-%day-%hour-%minute.%extension" } } } }' --request PATCH http://192.168.0.100:8989/api/v1/documents/xxxxxxxxxxxx/output-destinations/yyyyyyyyyyyySetting the Video Source of a Placer Layer
yyyyyyyyyyyyy will be the UUID of the video source. (e.g CCAF4418-367A-415F-AD25-6536C3EF3512)
xxxxxxxxxxxxx will be the API endpoint of the certain layer variant. (e.g. http://172.28.30.202:8989/api/v1/documents/2014814935/layers/BA868701-8131-49CB-8EDD-8C7E6E7CD60B/variants/AA868701-8131-49CB-8EDD-8C7E6E7CD60A)
curl -d '{"input-values":{"tvIn_VideoSourceAImage":"yyyyyyyyyyyyy"}}' -H "Content-Type: application/json" -X PUT "xxxxxxxxxxxxxxxx"Setting the Volume of a Layer that has an Audio Volume Knob
With this curl command, you can change the audio volume of a layer that has an audio adjustment knob (like the Placer layer). The value “volume” can take values from 0.0 to 1.0.
xxxxxxxxxxxxx will be the API endpoint of the layer (e.g. http://10.101.2.2:8989/api/v1/documents/13195157/layers/BA868701-8131-49CB-8EDD-8C7E6E7CD60B)
curl -d '{"volume": 0.5}' -H "Content-Type: application/json" -X PUT "xxxxxxxxxxxxxxxx"Setting the Color of a Background layer
xxxxxxxxxxxxx will be the API endpoint of the certain layer variant. (e.g. http://172.28.30.202:8989/api/v1/documents/2014814935/layers/BA868701-8131-49CB-8EDD-8C7E6E7CD60B/variants/AA868701-8131-49CB-8EDD-8C7E6E7CD60A)
curl -d '{"input-values":{"tvGroup_Appearance__Color_1":{"red": 1.0, "blue": 0.5, "green": 0, "alpha": 0.5}}}' -H "Content-Type: application/json" -X PUT "xxxxxxxxxxxxxxxx"Clearing the file path of a Last Recording video source
In your Source Repository, you can have a Last Recording Source which will provide access to the latest recording any File Recording Output Destination will announce. In a kiosk application, it will be necessary to clear the last recording path so that the next user of the station isn’t able to review the recording of the previous user. With the following Automation Layer command you can clear out this information from the Last Recording Source:
httpRequest(http://127.0.0.1:8989/api/v1/documents/2014814935/sources/2014814935-413AC0A3-AC43-4A7D-A228-6D0181BF1476?update=%7B%22filepath%22%3A%22%22%7D)Storing JSON Data in the mimoLive Document
With the “datastores” endpoint you can store any kind of data in the mimoLive document to persist it over a document reload. You need to use a “PUT” request to save the data and a “GET” request to read it back. You can store any kind of data however in this example we are storing JSON Data because this seems to be a very common use case. If you want to store different data you need to adjust the -H parameter accordingly.
Curl command to store data:
curl —data '{"myData1": 1.5, "myData2":"Some text"}' -H "Content-Type: application/json" -X PUT http://127.0.0.1:8989/api/v1/documents/1643911183/datastores/myDataStore1Curl command to read data back:
curl -X GET http://127.0.0.1:8989/api/v1/documents/1643911183/datastores/myDataStore1Update the Source File Path of a Media File Source
You may want to exchange the movie that is played or replace an ad shown by a Media File Source. This can be done with an update command performed on the source API endpoint.
Make sure that the file reference mode of the Media Source is set to “Absolut Path”. Get the API endpoint for this source by right-clicking on it in the left column and selecting “Copy Source’s API Endpoint to Clipboard” in the context menu. Craft an URL of the following form:
http://127.0.0.1:8989/api/v1/documents/<YOUR DOCUMENT ID>/sources/<SOURCE API ENDPOINT>?update={"filepath":"<LOCAL FILE PATH>"}Make sure to encode the JSON data in the URL to get a valid URL that can be used in a curl command like so:
curl -X GET http://127.0.0.1:8989/api/v1/documents/1748069974/sources/1748069974-334DA2E4-DFF3-4225-8F4A-D09D40A6BD5D?update=%7B%22filepath%22:%22~/Desktop/Screen%20Recording%202022-07-27%20at%2012.18.23.mov%22%7D*Please note that you can make use of the “~” at the beginning of the file path to reference the home directory of the current user.
Converting a CURL command with JSON Data To an HTTP URL for simple HTTP Requests
Sometimes it’s only possible to send a simple HTTP request to mimoLive rather than using a curl command, e.g. in the case of 3rd party automation apps or the Automation Layer mimoLive itself. This requires converting the data block of the curl command to be part of the URL. You can do so as follows:
Let’s assume we have the following curl command:
curl --data '{"data": { "attributes": {"settings": {"rtmpurl":"rtmp://mystreaminghost.com", "streamingkey":"MYTOTALLYSECRETSTREAMKEY"} } } }' --request PATCH http://192.168.0.100:8989/api/v1/documents/458706932/output-destinations/4D072496-1CE3-418E-B73E-59A2927A2110You would take the HTTP part first:
http://192.168.0.100:8989/api/v1/documents/458706932/output-destinations/4D072496-1CE3-418E-B73E-59A2927A2110Add ?update= to it:
http://192.168.0.100:8989/api/v1/documents/458706932/output-destinations/4D072496-1CE3-418E-B73E-59A2927A2110?update=Get all the —data string and remove all the unnecessary spaces:
{"data":{"attributes":{"settings":{"rtmpurl":"rtmp://mystreaminghost.com","streamingkey":"MYTOTALLYSECRETSTREAMKEY"}}}}Encode this to its URL form by escaping the non-URL conform characters (e.g. using https://www.urlencoder.org/)
%7B%22data%22%3A%7B%22attributes%22%3A%7B%22settings%22%3A%7B%22rtmpurl%22%3A%22rtmp%3A%2F%2Fmystreaminghost.com%22%2C%22streamingkey%22%3A%22MYTOTALLYSECRETSTREAMKEY%22%7D%7D%7D%7DFinally, put all this after the ?update= like so:
http://192.168.0.100:8989/api/v1/documents/458706932/output-destinations/4D072496-1CE3-418E-B73E-59A2927A2110?update=%7B%22data%22%3A%7B%22attributes%22%3A%7B%22settings%22%3A%7B%22rtmpurl%22%3A%22rtmp%3A%2F%2Fmystreaminghost.com%22%2C%22streamingkey%22%3A%22MYTOTALLYSECRETSTREAMKEY%22%7D%7D%7D%7DNow you can use this URL in a simple HTTP request.

