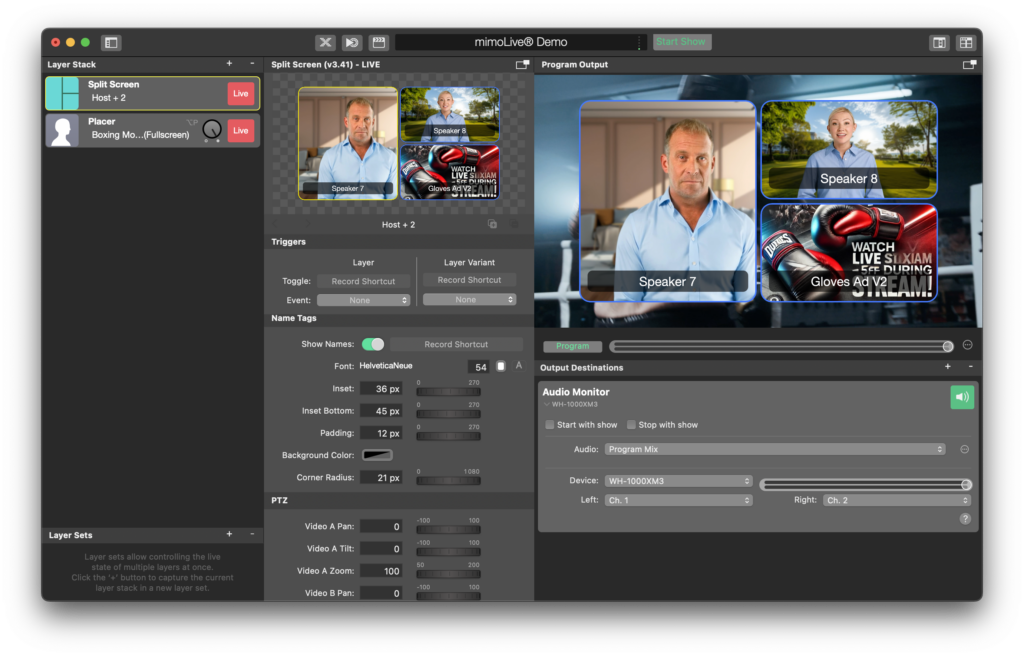
The mimoLive Split Screen Layer allows you to create dynamic layouts for live broadcasts, showcasing multiple video sources simultaneously. This is perfect for interviews, panel discussions, and events where multiple perspectives or participants are needed on screen at once. With a wide range of customization options, you can achieve a polished and professional presentation for your live stream.

Layer Setup Parameters
Triggers
- Toggle: Assign a record shortcut to enable or disable the split screen layer on command, allowing quick control during your broadcast.
- Event: You can link the activation of the layer to a specific event (currently set to “None”).
Control
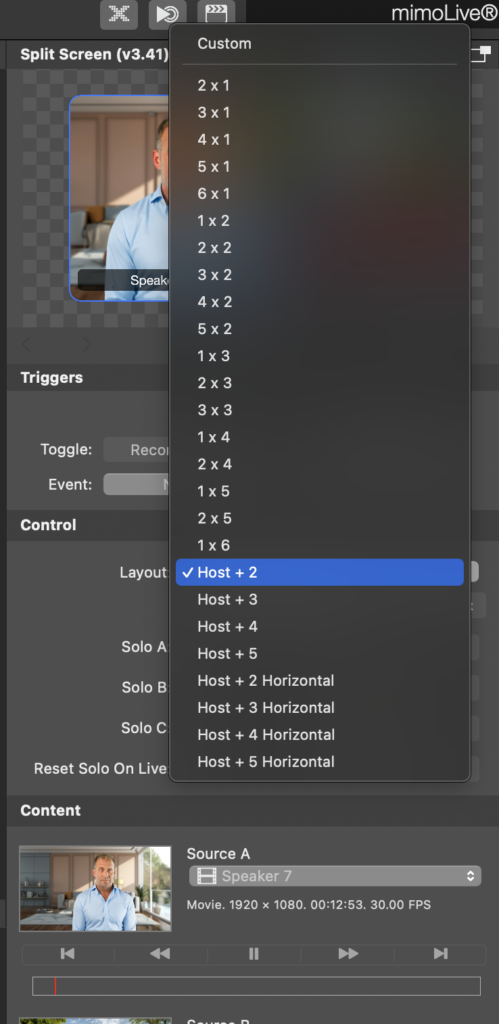
Layout: Choose the grid or layout for displaying the video sources. The available layout options are:

- Host + 2: Displays the host alongside two other sources.
- Host + 3, Host + 4, Host + 5: For larger discussions or interviews, additional layouts accommodate more participants.
- Grid Configurations: Layout options like 2×1, 3×1, 2×2, 3×2, and other grid configurations provide flexibility for how sources are arranged. This includes horizontal and vertical grids.
- Custom: Design your own custom layout by selecting the appropriate grid size based on your needs.
- Solo A, Solo B, Solo C: Use these toggles to highlight individual video sources by switching to solo views of specific speakers (A, B, or C) within the split-screen layout.
- Reset Solo On Live: Automatically resets the solo view and returns to the main layout when the layer goes live, ensuring the stream starts with the correct visual configuration.
Content
- Source A: Select the primary video source, often the host or main speaker. For example, in the screenshot, Speaker 7 is used as Source A.
- Source B: Select a secondary video source, such as a guest or co-host. In the screenshot, Speaker 8 is used as Source B.
- Source C: This could be an additional guest or content like a product ad. In the screenshot, the Gloves Ad V2 is used as Source C.
- Source Names: You can label each source if necessary, which will help distinguish between different inputs in more complex streams.
Appearance Settings
Gap Size
• Gap Size: Control the spacing between the video sources. Adjusting this will create more or less space between each window in the split screen. For example, the gap size is set to 16 px in the screenshot, which keeps each window visually separated while still maintaining a cohesive layout.
Background
• Background: Choose a background for the entire layout. Options include setting a solid color or using a custom background image. In this example, the background is set to None for transparency, which can be useful when overlaying the split screen on top of other content.
Borders
- Border: Toggle on or off to add a border around each video window for clarity and separation.
- Border Width: Adjust the thickness of the border. The current border width is set to 5 px.
- Border Color: Choose a color to make the border stand out. In this example, a light blue border has been applied, creating a clean visual frame around each video source.
Corner Radius
- Corner Radius: Round the corners of the video windows for a modern, softer look. The example shows a 21 px corner radius, which gives each window rounded edges, adding a professional touch to the broadcast.
PTZ (Pan-Tilt-Zoom) Settings:
The PTZ Controls allow fine adjustments to each video source’s positioning within the frame.
- Video A Pan, Tilt, Zoom: Adjust the framing of Source A. Use the pan and tilt to move the video within the frame and the zoom to bring the subject closer. The default zoom for Video A is set to 100.
- Video B Pan, Tilt, Zoom: Adjust Source B in the same way to ensure that the subject is correctly framed and in focus.
- Video C Pan, Tilt, Zoom: Adjust Source C as needed, especially useful when displaying non-speaker content like ads or pre-recorded segments.
These controls are especially helpful when you want to make sure each speaker or video source is framed correctly without needing to physically adjust cameras.
Animation Settings
1. Solo Transition
- Solo Transition: Choose how to transition between solo views (when a single speaker is in focus) and the full split-screen layout. Options include:
- Zoom Animation: Smoothly zooms in or out of the selected solo speaker, adding a dynamic touch to the transitions.
- Other Transition Types: Additional options include dissolves, slides, and cuts for different visual effects.
- Transition Duration: Control how long the transition takes between views. In the example, the duration is set to 0.5 seconds, offering a quick and smooth change between solo and split views.
Geometry Settings
- Window Top, Bottom, Left, Right: Fine-tune the positioning of the entire split-screen layout on the screen by adjusting the window boundaries. This ensures that the layout fits perfectly within the broadcast frame without cutting off important elements.
- Example settings: Top is set to 108 px, and Left is set to 192 px for precise placement on the screen.
Highlighting Mode
The Highlighting feature allows you to automatically or manually emphasize the active speaker during a live broadcast.
- None: No highlighting, maintaining equal emphasis on all video sources.
- Automatically (Audio): Automatically highlights the speaker who is currently talking by zooming in or making their window more prominent based on audio detection. This is useful for live discussions or debates where participants speak at different times.
- Manually: The operator can manually select which speaker to highlight by switching between sources.
Practical Tips
- PTZ Control: Use the PTZ settings to adjust each video feed without needing to move the cameras. Zoom in on speakers to give a dynamic look, or pan and tilt to ensure proper framing.
- Solo Views: Switching to solo views during discussions can help draw attention to a specific speaker. Combining this with the Zoom Animation creates smooth, professional transitions.
- Highlighting: Use the automatic audio-based highlighting in situations where multiple speakers are involved. This ensures that the most relevant speaker is emphasized without manual intervention.
- Custom Layouts: For unique broadcasts, the Custom Layout option allows you to create specific grids and configurations based on the number of speakers or the content being shown.
The mimoLive Split Screen Layer gives you ultimate control over how multiple video sources are displayed in your live streams. With features like dynamic layouts, PTZ controls, and automatic speaker highlighting, you can create a professional and engaging viewing experience for your audience. Whether hosting interviews, panel discussions, or multi-source events, this layer helps you present content in a polished and organized way.

