
Create advanced Lower Thirds with Background Animation
Our Lower Thirds Pro layer is a powerful tool that can help you create professional-looking Lower Thirds for your live video productions. With the ability to use custom animations as a background, you can create a truly unique and engaging viewing experience for your audience. To use your own animations, simply create them in a third-party app like Motion or Adobe After Effects and render them as movie files. Our Lower Thirds Pro layer can then use these files as a background for your lower thirds.
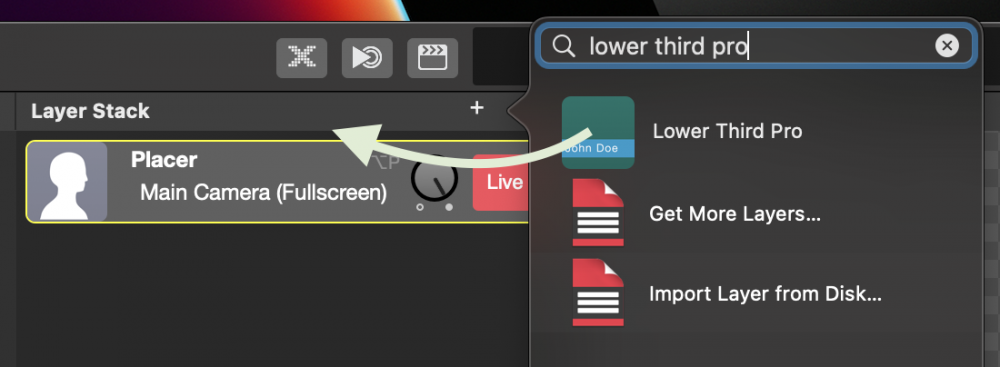
Start with the Lower Thirds Templates
But don’t worry if you don’t have the skills or resources to create your own animations – we also offer a wide range of pre-designed Lower Thirds templates that you can easily customize to fit your brand and style. So whether you’re hosting a talk show, webinar, or another type of live video content, our mimoLive Lower Thirds Pro layer can help you create professional-looking lower thirds that will impress your viewers.
Designing the Animation Movie as a Background for the Lower Third Pro Layer
Many customers want to use their own animations for a lower-third background. Usually, they create the animations in third-party apps like Motion or Adobe After Effects. mimoLive can use those designs if they are rendered as movie files. These are the requirements:
- The background movie file needs to be rendered in AppleProRes 4444 in order to keep the transparency areas transparent.
- The horizontal dimensions should match the pixels width of the mimoLive document. (e.g. 1920 pixels wide for a 1080p resolution)
- If possible crop the video at the top and the bottom as much as you can avoiding the need for mimoLive to render large areas of transparent pixels. This will also reduce the processing time for the AppleProRes 4444 codec which gives mimoLive more room for other things.
- The text of the lower third graphics will be generated by mimoLive. So there is no need to add them in the background movie.
- The movie should consist of three parts:
– The Intro: The first part will be building up the Lower Third starting with a completely transparent screen. Keep in mind that mimoLive can produce the text within that time.
– The Loop (optional, see “Timing Mode” below): In the middle, you can have a looping part (e.g. a highlight is flashing up). For the best experience, you should make it that way so that it loops seamlessly. However, it is essential to know that mimoLive can’t loop the movie on a certain frame but only on time with a tolerance around the frame rate of the mimoLive document.
– The Outro: After the loop, the lower third should disappear until the complete screen is transparent again.
You can download this movie file to get an idea of how such a background movie should look like. Also, its royalty-free so you can use it in your own production: Lower Third Pro Sample Background Movie
Setting up the Lower Third Pro Layer Behaviour
Add the Lower Third Pro layer to your Layer Stack.

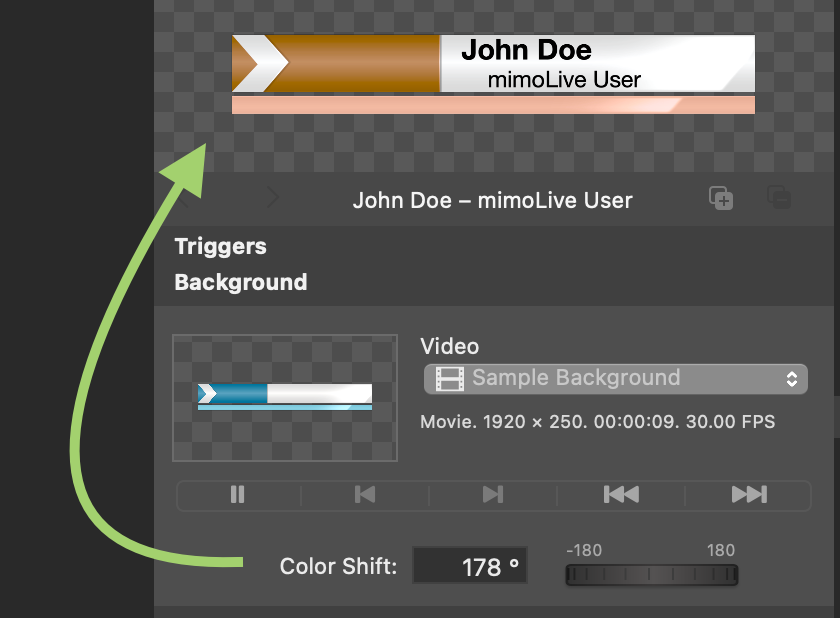
Import your background movie (created by following the requirements above) into the Source Repository on the right of your mimoLive document. Select this video in the Background section of the Lower Third Pro layer.
With the “Color Shift” parameter you are able to change the colors of your background movie on the fly. This is helpful if you want to adopt a rendered movie file to a different CI.

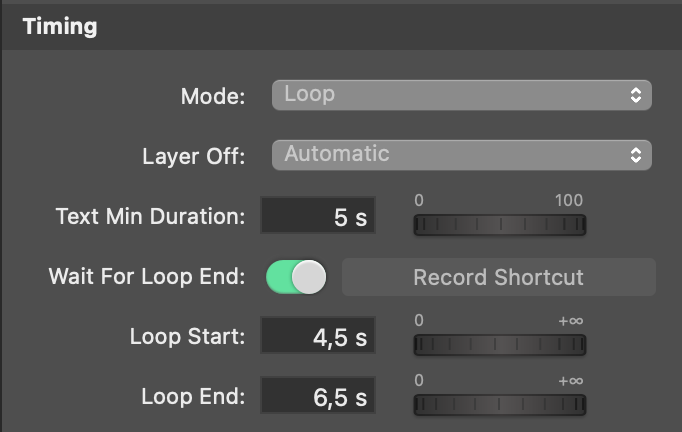
The Lower Third Pro layer needs to know the timing of your animation movie. You can set up those parameters in the Timing section:
The Mode parameter will describe how you want to treat the background movie:
- “None Stop” will let run the lower third in one take.
- “Pause” lets the lower background movie pause at a specific time.
- “Loop” means that you have added a looping section in your background movie and you want to use it in a loop.
You will notice that depending on which Timing Mode you chose there will show up different parameters below the Mode parameter.
In the case of “None Stop” there are no special timing parameters necessary: The background movie will just play as is and the layer will switch off automatically once the movie has finished.
If the mode is set to “Pause” or “Loop” you got the option to specify by the “Layer off” parameter if you want to switch off the layer “manually” or “automatically”. In the case of “manually” the layer just waits for you to switch off the layer. Then it will perform the outro as specified below. In the case of “automatically” the layer will display the lower third text at least for the time you specify by “Text Min Duration”. After that time has passed the outro will be performed.
For the mode “Pause” there is a special parameter “Pause at”. This defines when the background movie should be paused to display the text.
When the mode “Loop” is selected the additional parameter “Wait for Loop End”, “Loop Start” and “Loop End” are appearing.
- “Wait for Loop End”: If this option is checked mimoLive plays the loop part of the background movie until the end before starting the outro phase. This gives a seamless experience for the audience. However, the lower third may look “unresponsive” to the mimoLive user because it may not look like the layer will shut off. Whereas If this option is switched off mimoLive will start the outro phase immediately after you switch off the layer. This gives a faster response time but will also interrupt the background movie’s looping part.
- “Loop Start”: This is the absolute time in the movie when the looping part starts.
- “Loop End”: This time specifies the endpoint in absolute time of the looping part in the background movie.
Setting up the Timing for the Text of the Lower Third
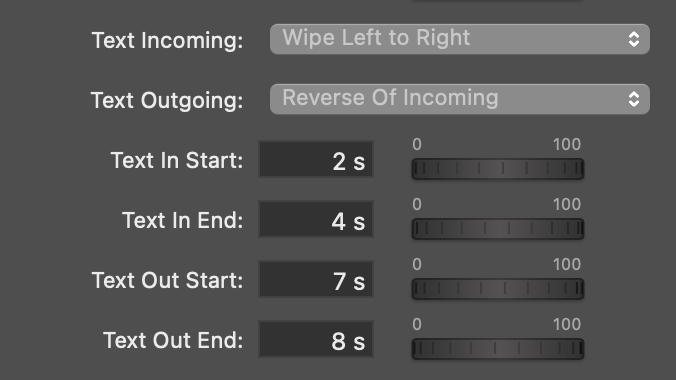
In the Timing section of the Lower Third Pro layer, you will find several timing parameters for the Text. First of all, you specify how the text should appear in the intro and the outro phase:
- Cut
- Dissolve
- Wipe Left to Right
- Wipe Right To Left
- Push up
- Push Left to Right
- Push Right to Left
The parameter pair “Text In Start” and “Text In End” define when the text animation should start and when the animation should be done.
“Text Out Start” and “Text Out End” specifies when the text of the lower third should disappear with the animation selected above. Please note that those times need to be within the outro phase otherwise the text will “jump” off.
Please note that you can manipulate the Text and Loop parameters directly in the preview of the layer.
Setting up the Appearance of the Text in the Lower Third Pro Layer
There are two lines of text in the Lower Third Pro layer. They are referred to as Titles and Subtitles. Both of those have their own parameter set consisting of the following options:
- “Font Face”, “Font Color” and “Font Size”
- “Kerning” (brings the characters more together or more apart which can be nice effects)
- “Outline Size” and “Outline Color” makes a border around each character
Common settings for Title and Subtitle are the “Text Alignment” (left, center, right) and the “Drop Shadow” option.
Setting up the Position of the Text
The parameters for the position of the text may seem a bit awkward at the first glance but makes more sense if you see both text lines as one group. However, if those parameters won’t help you you can still move the text directly in the layer’s preview around.

