
About the Weather Forecast Template
The Weather Forecast Template in mimoLive is a pre-configured setup designed to streamline the creation of multi-day weather segments for live broadcasts or recordings. It features customizable layouts with support for up to 10-day forecasts, integrating weather icons, temperature ranges, and precipitation probabilities. Users can input data manually or import it from external sources, tailoring the presentation to their specific needs. The template also offers animation options and layout adjustments to enhance visual appeal and clarity. Ideal for meteorologists, educators, or content creators, this template simplifies the process of delivering professional-grade weather forecasts.
Template Elements
Sources
- Camera Source (Video Source)
The Camera Source in mimoLive is a versatile input that supports a wide range of video and audio devices, from built-in webcams and USB capture dongles to professional HDMI and SDI interfaces. This section of the manual guides you through connecting and configuring video sources—including DSLRs, webcams, screen grabbers, and capture cards—to integrate live video into your production.
Layers
- Station Logo Layer
The Station Logo layer displays a branding image, such as a network or channel logo, on top of your video output. This ensures consistent branding throughout your show. The layer can be easily positioned, scaled, and faded in or out using various transitions. - Date and Time Layer
Display a digital date and time in your video. Content – Date Format The string can contain the following placeholders which will be automatically replaced by mimoLive. PlaceholderUsage%aabbreviated weekday name (e.g., Wed)%Afull weekday name (e.g., Wednesday)%babbreviated month name (e.g., Sep)%Bfull month name (e.g., September)%cdate and time (e.g., 09/16/98 23:48:10)%dday of the month (16) [01-31]%Hhour, using […] - Lower Third Layer
The Lower Third layer lets you create, animate and control all kinds of lower thirds. Usually, it’s used to introduce a person with their name and a description such as a job title or position. Often a lower third contains a combination of a company logo, name, and title. - Picture in Picture (PIP) Window Layer
The Picture-in-Picture (PiP) Window Layer in mimoLive allows you to overlay a smaller video or graphic on top of your main content, creating a secondary frame within the live broadcast. This is particularly useful for showing multiple sources at once, such as a speaker’s face during a presentation, or a secondary video feed alongside a […] - Weather Map Layer
Overview The Weather Map layer for mimoLive allows you to display a map with weather symbols, temperatures, wind directions, and other meteorological data overlayed on top of your live video production. Typically, this layer is used to present a professional-looking weather forecast segment during a livestream, broadcast, or recorded show. Key Features • Flexible Data […] - Weather Forecast Layer
Use clear and intuitive weather icons to ensure easy understanding. Limit the forecast to 3-5 days to maintain clarity and avoid overwhelming the audience. Set smooth animation timing for a polished, professional broadcast. The Weather Forecast layer helps you deliver a concise, visually engaging weather segment, tailored to the needs of your audience. - World News Layer
The World News Layer in mimoLive allows you to create visually appealing, rotating globe effects, perfect for news broadcasts or global-themed presentations. This layer provides control over the rotation, axis orientation, globe style, and much more, allowing users to customize the look and feel of their broadcast. Key Features Layer Configuration 1. Adding the World […]
Output Destination
- File Recording to Disk (ISO Recording)
With the Recording to Disk feature, you can easily record your mimoLive productions to your local disk. This is especially useful for users who want to have a backup of their live streams, or for those who want to edit their videos later. You can choose between various output codecs such as h.264, multiple Apple […] - Audio Aux Output
Send audio output to audio devices New documents created with mimoLive automatically add an Audio Aux Output Destination, named Audio Monitor, that allows you to route audio mixes to a specific audio output device. You can add additional Audio Aux Output Destinations to route any desired audio mix to the same audio output device using […]
Creating a new Document from the Weather Forecast Template
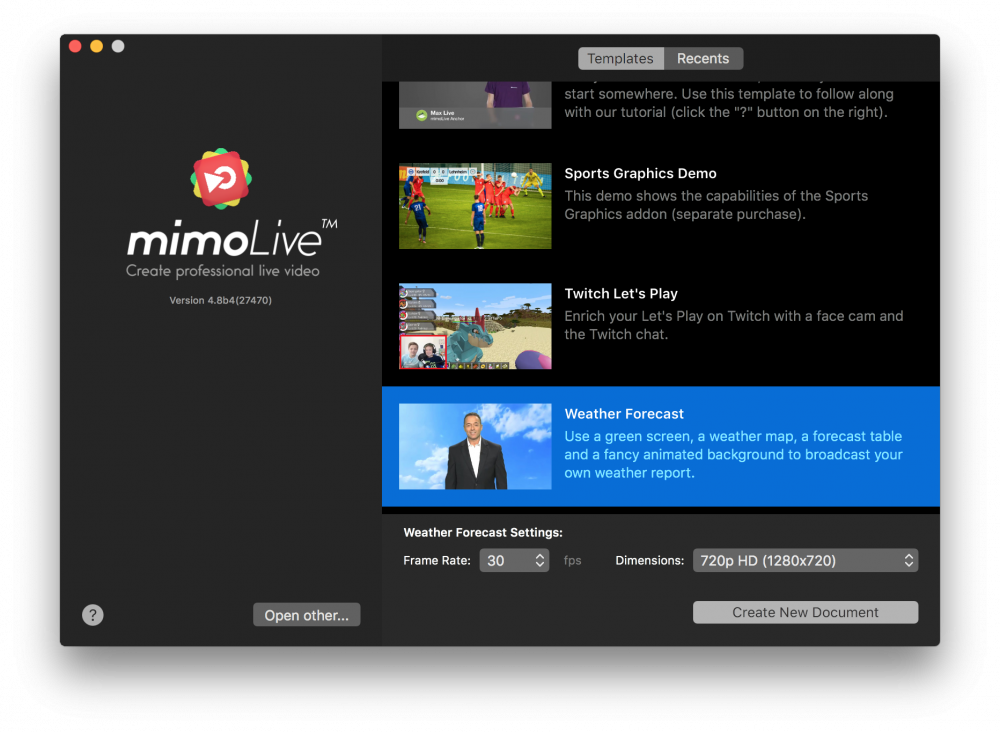
- Launch mimoLive. The New Document window will open up and let you select either a Template or choose from recently opened documents. If you don’t see the New Document window please choose “mimoLive > New…” in the main menu.
- Find the “Weather Forecast” template in the list of templates and select it. A sheet will open up at the bottom of the New Document window showing additional options.
- You need to specify the frame rate and the dimensions you want the video to be. It’s reasonable to go with 30fps and a 720p dimension.
- Click on the “Create New Document” button in the lower right corner. A new mimoLive document window will open up with lots of pre-configured layers.
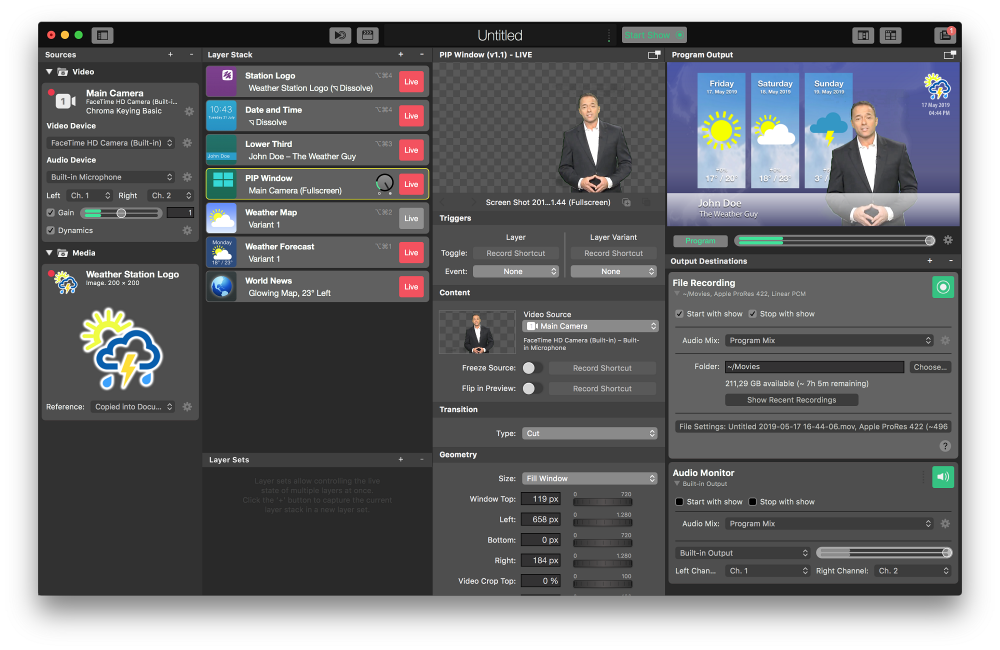
Configuring the New Weather Forecast Document
In order to make the document work, you need to set up the main camera as well as the applied chromakey filter.
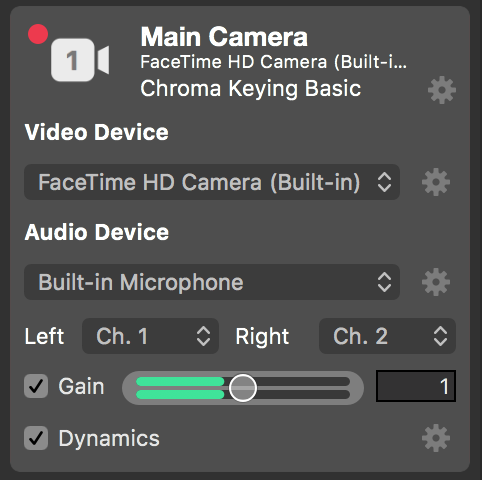
- Find the Main Camera in the most left Sources Repository and select it.
- Make sure the “Video Device” popup shows the correct camera of your setup.
- Check if the “Audio Device” is the one you want to capture. If you make noise a green volume indicator will react below.
- Click on the action gear right next to the Chroma Keying Basic video filters label on top of the video source. This will open up a control panel to adjust the chroma key.
If you don’t have a chromakey background then you can remove the filter by clicking on the “x” button that will appear if you hover over the filter entry with the mouse cursor.
- Let an anchorman step into the scene and hit the “Auto Adjust” button at the top of the panel. If you are not happy with the estimated parameters you can adjust them manually.
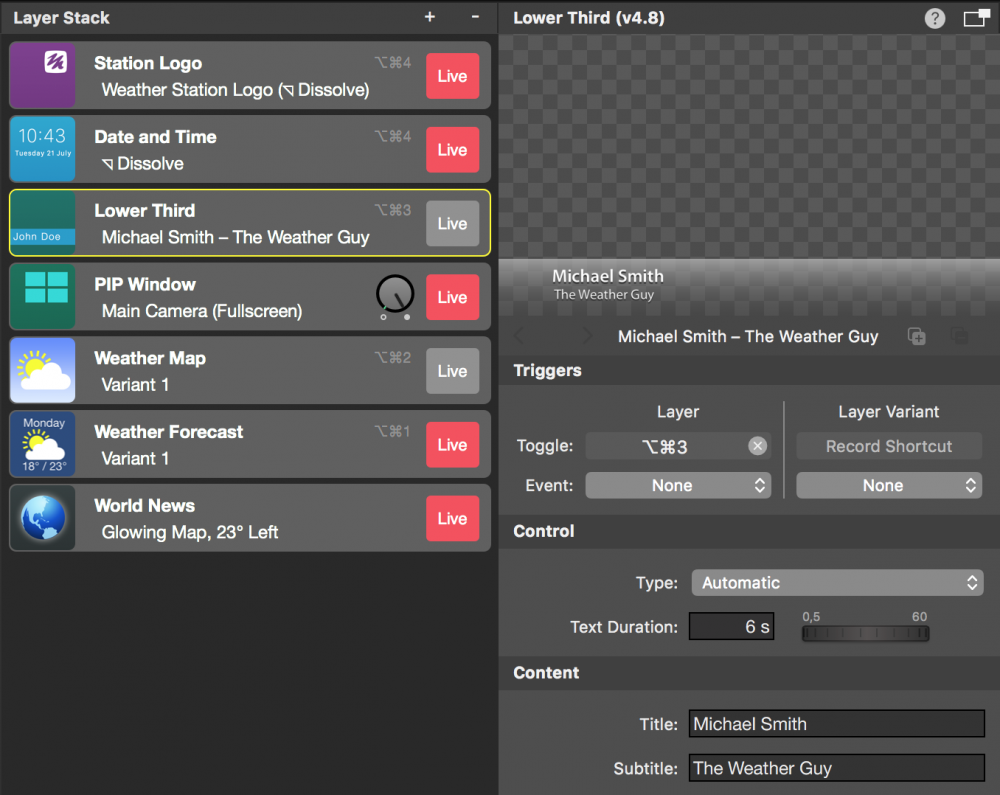
- Head over to the Layer Stack in the next right column and click on the “Lower Third” layer. The layer will get a yellow boundary indicating that it is the one that’s parameters will be shown in the parameters column right next to it.
- In the parameter column, you can change the title of the anchorman from “John Doe” to the correct name of your anchorman. Notice the immediate change in the layer preview above as well as the Program output in the upper right corner of the mimoLive document.
- Switch the control type from “Manual” to “Automatic”. This means that the layer will shut down itself after a certain time.
- If you want to adjust the weather data you can configure the “Weather Map” layer and the “Weather Forecast” layer accordingly. For a first trial, this is not necessary.
- Save the document by clicking “File > Save as…” in the main menu. A drop-down sheet will ask for a name for the document and a location where to save it to.
Recording a Weather Forecast Show
Now everything should be set up for your first recording.
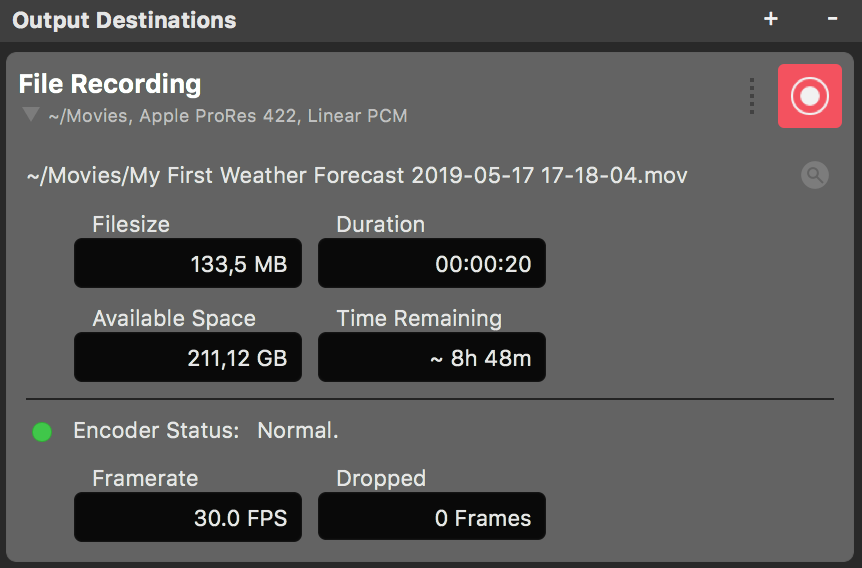
- Find the Start/Stop Show Button at the top of the mimoLive
document and click it. The File Recording Output Destination on the far right should turn to red indicating that its recording.
- Let the anchorman do their job.
- After a while click on the Live button right next to the Lower Third layer in the Layer Stack. The anchorman’s name will appear in the Program Out.
- Once the Weather Forecast show is over click on the Stop Show button at the top of the document window again. The File Recording Output Destination will turn to green and a new window will pop up containing a list of the recent recordings.
- Double click on the topmost line in the Recent Recordings window in order to open the just recorded Weather Forecast Show in QuickTime player for playback.