
About the iPhone Screencast Template
This mimoLive tutorial will explain how to configure the build-in iPhone Screencast template in mimoLive. The template demonstrates the ability of mimoLive to record in any aspect ratio and pixel dimensions.
Template Elements
Sources
- Camera Source (Video Source)
The Camera Source in mimoLive is a versatile input that supports a wide range of video and audio devices, from built-in webcams and USB capture dongles to professional HDMI and SDI interfaces. This section of the manual guides you through connecting and configuring video sources—including DSLRs, webcams, screen grabbers, and capture cards—to integrate live video into your production. - Audio Source
The Audio Source provides audio input from a microphone, a camera with an integrated microphone or some kind of audio interface that is connected to your Mac. Bringing Audio into mimoLive Audio devices can be connected to the Mac in several ways: USB, Thunderbolt, and FireWire. Some devices are even virtual devices that receive data […]
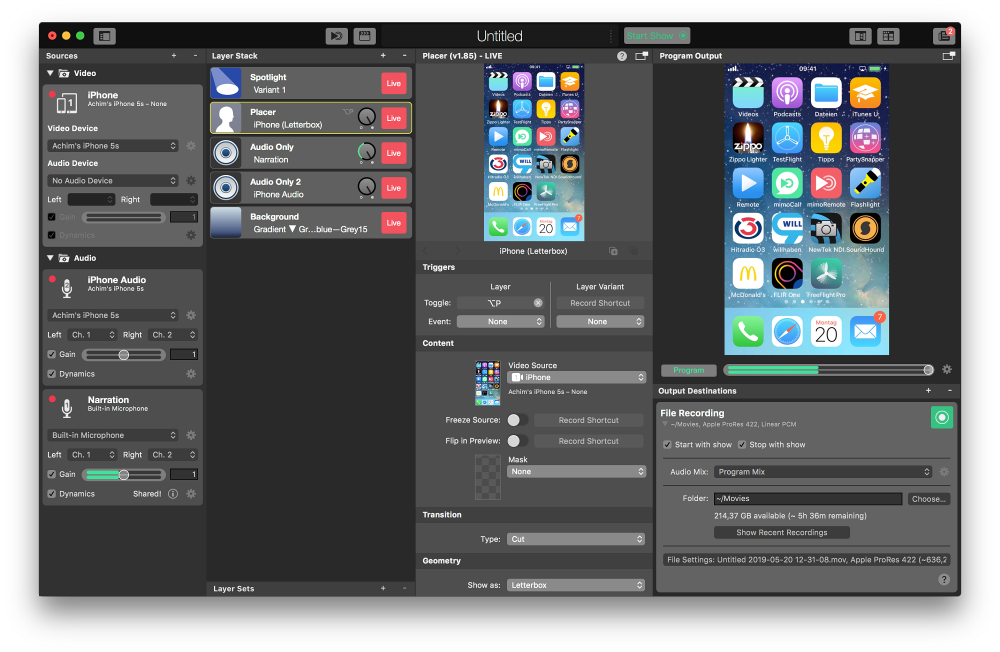
Layers
- Spotlight Layer (Mouseposé Effect)
The Spotlight layer in mimoLive allows you to highlight specific parts of an image or video. You can adjust the opacity, color, size, and blur of the spotlight effect to optimize it for your content and adapt it to your brand’s visual identity. This layer is an effective tool for drawing attention to key elements […] - Placer Layer
When starting with mimoLive®, the first tool you should familiarize yourself with is the Placer Layer. This basic yet pivotal layer is the cornerstone of creating visually engaging and professionally structured broadcasts. In this guide, we will explore why the Placer Layer is foundational, its capabilities, and how it enhances your video production process. The Placer Layer is the most basic representation of your footage in the layer stack. It enables you to perform basic edits to the appearance. - Audio Only Layer
The Audio Only layer injects audio input from any source thats provides audio, like an Audio Source, a Video Source, a Media File Source or a Media Playlist Source, into the program output. - Background Layer
The Background Layer in mimoLive is a fundamental tool for creating visually engaging live streams and video productions. This layer serves as the foundational element of your scene, providing you with options to display solid colors, two-color gradients, or even multi-color gradients. Related Topics Key Features and Customization Options: 1. Type: 2. Direction: 3. Color […]
Output Destinations
- File Recording to Disk (ISO Recording)
With the Recording to Disk feature, you can easily record your mimoLive productions to your local disk. This is especially useful for users who want to have a backup of their live streams, or for those who want to edit their videos later. You can choose between various output codecs such as h.264, multiple Apple […]
Creating a new Document from the iPhone Screencast Template
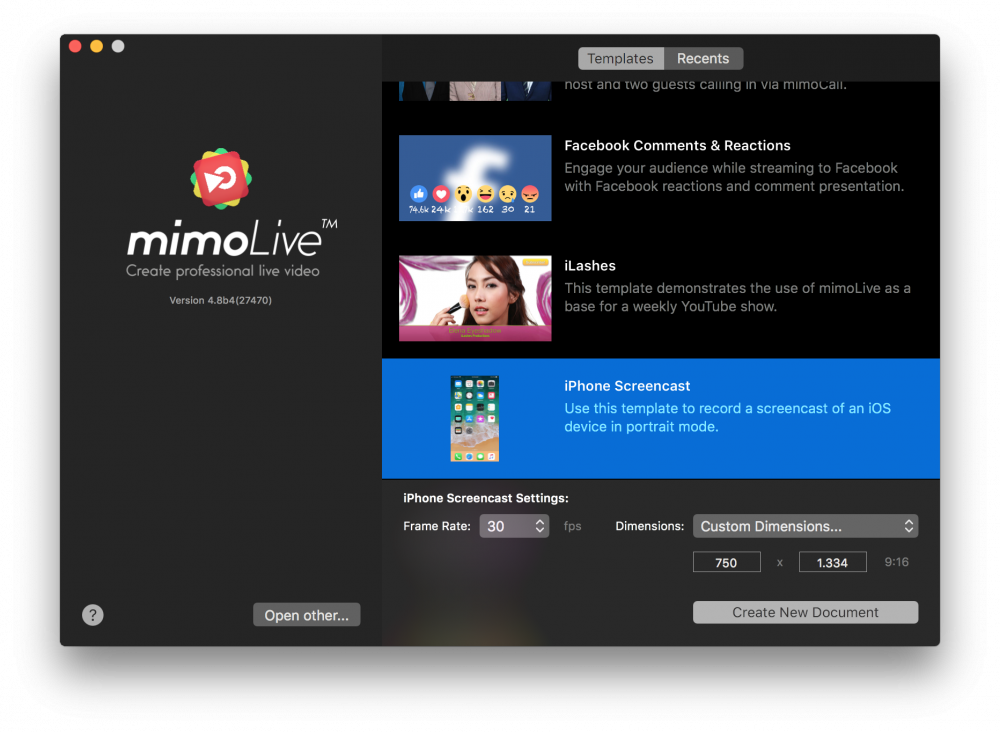
- Launch mimoLive. The New Document window will open up and let you select either a Template or choose from recently opened documents. If you don’t see the New Document window please choose “mimoLive > New” in the main menu.
- Find the “iPhone Screencast” template in the list of templates and select it. A sheet will open up at the bottom of the New Document window showing additional options.
- You need to specify the frame rate you want the screencast to be. It’s reasonable to go with 30fps.
- Change the Dimensions popup menu to “Custom”. Additional input fields will show up below. Enter the pixel dimensions you want to record in.
Use the native pixel dimension of your iOS device
Use the native pixel dimension of your iOS device to avoid cropping or scaling of the user interface. Please refer to iOS Resolution in order to find the correct pixel dimension of your iOS device. Enter the width and height into the appropriate fields in the custom dimensions field.
- Click on the “Create New Document” button in the lower right corner. A new mimoLive document window will open up with lots of pre-configured layers.
Configuring the New iPhone Screencast Document
In order to make the document work, you need to connect your iOS device to the Mac and set up some sources accordingly.

- Connect your iOS device with your Mac via a USB cable. Unlock your device. If you are prompted to confirm the connection to your computer please accept.
- In mimoLive on your Mac find the Main Camera in the most left Sources Repository and select it.
- Click on the “Video Device” popup and select your iOS Device as the video source. After a couple of seconds, you should see the screen of your device in mimoLive.
- Click on the “Audio Device” popup and select “No Audio Device”. We will capture the audio in a different mimoLive source so you are able to switch it on and off easily.
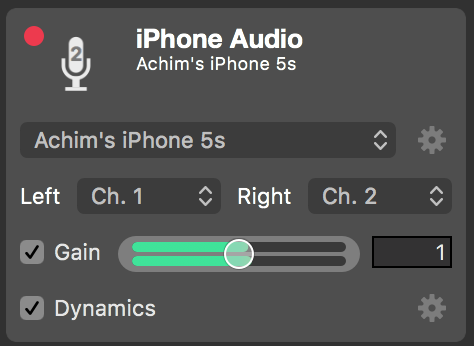
- Below the iPhone video source is an Audio Only source called “iPhone Audio”. Please select your iOS device as the audio source in the popup menu.
- Save the document by clicking “File > Save as…” in the main menu. A drop-down sheet will ask for a name for the document and a location where to save it to.
Record an iPhone screencast
Now everything should be set up for your first screencast recording.
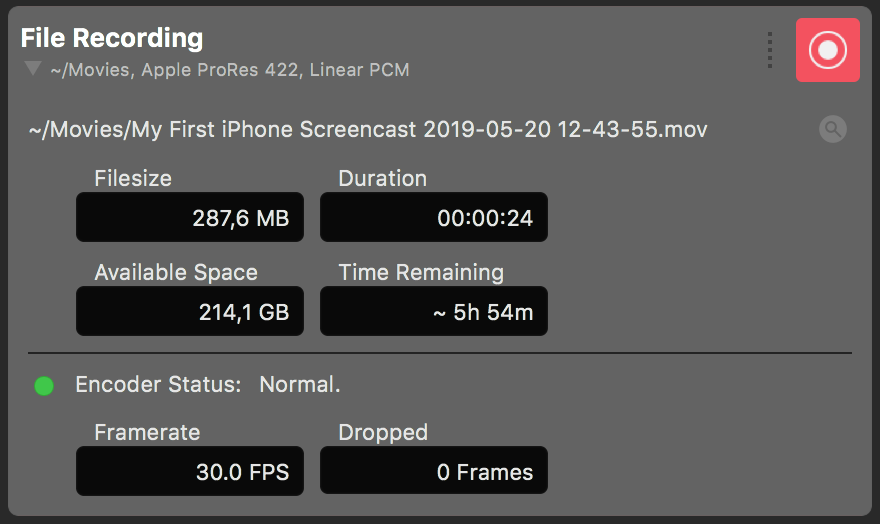
- Find the Start/Stop Show Button at the top of the mimoLive document and click it. The File Recording Output Destination on the far right should turn to red indicating that it’s recording.
- Now you can explain the latest features of your iOS device.
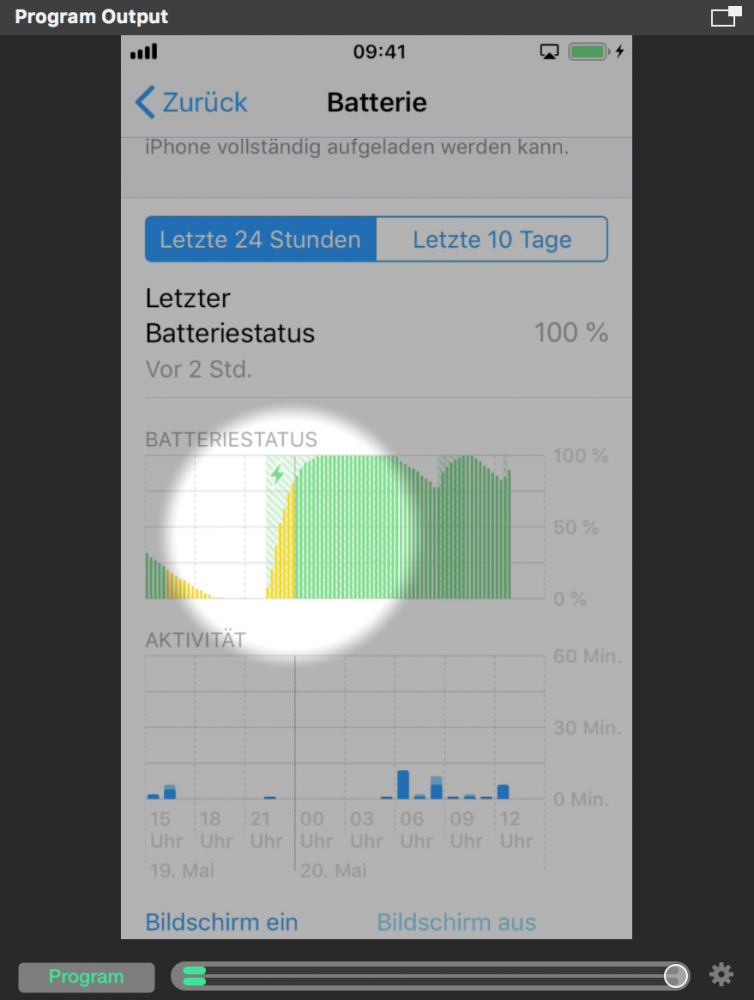
- In order to highlight a part of the user interface of your iOS device you can click into the Program Out the window. A spotlight circle will be drawn around your mouse cursor. This will focus the attention of your audience to that point. The effect is created by the Spotlight layer on top of the Layer Stack.
- In the Layer Stack you can see two Audio Only layers that are responsible to bring the audio into the final product. Select the “Audio Only 2” layer to reveal its settings.
- Find the “Ducking” section in the settings panel of this Audio Only Layer. Please note that this audio will be ducked depending on the volume of the “Narration” audio source.
iOS audio will duck if the narration is detected
Adjust the “Threshold” parameter so that the ducking gets triggered if you talk normally. You can see the comparison of the volume and the threshold parameter at the bottom of the layer’s preview above.
Find further information on Ducking here: Audio Only Layer
- Once the iPhone Screencast is over click on the Stop Show button at the top of the document window again. The File Recording Output Destination will turn to green and a new window will pop up containing a list of the recent recordings.
- Double click on the topmost line in the Recent Recordings window in order to open the just recorded iPhone Screencast in QuickTime player for playback.