The Media Playlist Source in mimoLive plays multiple media files one by one. Because it’s a video source you can assign it to any layer that works with video sources. If the playlist contains video files, by default a Placer Layer
is inserted when you drag a source to the Layer Stack.
If the playlist consists of only audio files, the default is an Audio Only layer.
Setting Up The Media Playlist Source

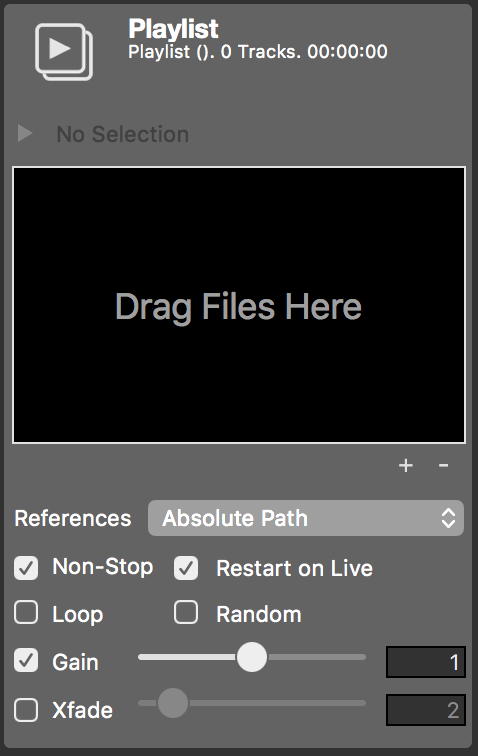
Reference Mode
- Absolute Path: The media file won’t be copied to the document, therefore saving hard disk space. However you need to make sure not to move the referenced file on your hard disk. Otherwise, mimoLive won’t be able to find it.
- Copied into document: The media file will be copied and stored within the mimoLive document bundle. This doubles the needed hard disk space per media file but makes it possible to easily transfer the mimoLive document to another computer without fearing to loose the link to the media file.
Controlling the Reference Mode with Option and Control key
When adding media files by dragging from the Finder to the mimoLive Source Repository, you can hold the Option or Control key to force the Absolute Path reference mode. This comes especially in handy with large or many files that you don’t want to copy to the document.
Playback Mode
- Non-Stop: When this option is set all the media files in the Media Playlist will be played in a row. When the option is switched off the Media Playlist Source will stop after each item and only starts playing the next item when it is activated again.
- Restart on Live: Starts from the first media file in the list when the Media Playlist source is activated again. This option is only available when the Non-Stop option is switched on.
- Loop: When the loop option is enabled on the Media Playlist Source will automatically start all over again once it reached its end. This option is only available if the Non-Stop option is enabled.
- Random: Shuffles the media files randomly during playback. However, it will make sure that each file will be played at least once.
Common Scenarios
When you have multiple commercials that you want to play in a row, enable “Non-Stop” and disable “Loop” so that the commercial break will stop automatically once all commercials have been played.
When you want to present footage videos one by one in a live show, disable the “Non-Stop” option. When you put the Media Playerlist Source into your layer stack with a Placer Layer this layer will switch off automatically once a single movie has played. The Media Playlist Source automatically advances to the next media file when it is activated again.
Another common usage is the playback of ambient music. Add as much audio files to the Media Playlist source as you like, set it to play “Non-Stop”, “Loop” and “Random”. When using the Playlist Visualizer layer in conjunction, it will show the meta data of the audio files.
Adding Media Files to the Media Playlist Source
After this setup you can drag files to the drop target labeled Drag Files Here. The Media Playlist Source can play back movies and audio files. The media files will appear in a list. You are free to rearrange the media files or remove them with the x button which appears while hovering over a media file.
The + button below the list lets you add media files by choosing them in a file dialog.
Clicking on the – button will remove the selected media file(s).

Inspecting Meta Data of Media Files
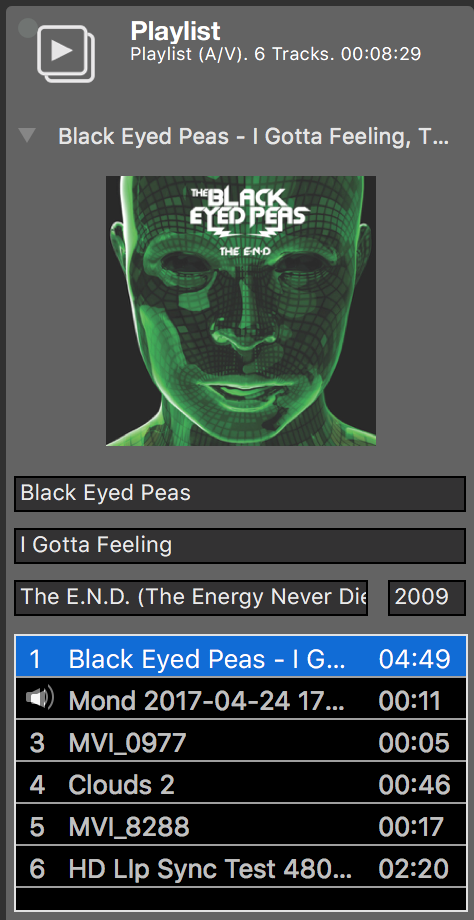
Once you selected a media file in the file list you can reveal more detailed information by clicking on the triangle disclosure button above the list. The info panel shows either a movie preview or the cover artwork contained in an audio file. You can edit the author, title, album and year. This data will be used in the Playlist Visualizer layer.
Audio Controls

- Gain: When switched on, the volume of the Media Playlist Source can be adjusted with the slider right next to it.
- Xfade: This option lets you define a crossfade to happen once an audio file ends and the next is about to begin. Adjust the crossfade time in seconds with the slider next to it.
Xfade Is Audio-Only
Crossfades only work for transitions between audio files. Transitions between, to and from video files will never apply any fade or crossfade.

