
About the Camera Source
The Camera Source in mimoLive combines both a video device and an audio device into a single input. Although it’s commonly used to bring a camera feed into your production, its functionality goes far beyond that.
You can use the Camera Source to:
- Connect a webcam or professional camera.
- Capture video output from an external device via HDMI (e.g., laptops running PowerPoint, Apple TV, or VCRs).
- Bring in gameplay or desktop feeds using HDMI capture devices.
Even of this versatility, mimoLive refers to this input simply as the “Camera Source” rather than more broadly “Video Source”.
Connecting Video Devices to mimoLive
Most Macs include a built-in webcam, which mimoLive can use immediately. However, standard Mac configurations typically do not include built-in video capture hardware for external video sources. To connect external video signals—such as cameras, laptops, or other media devices—you’ll need a separate video capture device.
There is a wide range of hardware available, from simple USB HDMI grabbers to high-end professional SDI capture interfaces.
Device Compatibility
The Camera Source in mimoLive supports all input sources that are accessible through standard macOS APIs. A video device is considered compatible with mimoLive if:
- It does not require a custom driver, because it is natively supported by macOS.
- Or, the device vendor provides a driver that integrates with modern macOS frameworks (such as AVFoundation or CoreMediaIO).
Before purchasing a capture device, verify with the manufacturer that it supports macOS and conforms to Apple’s recommended driver architecture.
Capturing HDMI Video Signals
To capture HDMI video signals from external sources—such as video camcorders, DSLRs, or laptops running presentations—you’ll need an HDMI video input device. mimoLive supports a variety of hardware solutions depending on your preferred interface: Thunderbolt or USB 3.
HDMI Video Input via Thunderbolt
For professional-grade HDMI capture using Thunderbolt, the following devices are recommended, because these devices offer low-latency, high-quality video capture and are well-suited for demanding production environments:
- Blackmagic Design DeckLink Mini Recorder
- Blackmagic Design UltraStudio Mini Recorder
- Blackmagic Design PCI cards in a PCIe expansion box (for example Sonnet Technologies)
- Magewell Pro Capture cards in a PCIe expansion box (for example Sonnet Technologies)
HDMI Video Input via USB 3
USB 3 HDMI capture devices are a popular choice due to their ease of use and driver-free setup. These devices are particularly useful for mobile setups or quick deployment scenarios. mimoLive supports many plug-and-play USB 3 devices, including:
- Magewell USB Capture HDMI
- AJA U-TAP
USB 3 devices that conform to UVC (USB Video Class) standards work out of the box with macOS and are recognized by mimoLive without requiring additional drivers.
Connecting DSLR Cameras
Using a DSLR camera as a video source in mimoLive can significantly improve the visual quality of your production. However, not all DSLR models are suitable for live video workflows. Before choosing a DSLR camera, make sure the following requirements are met:
- Clean HDMI Output: The camera must provide a “clean” HDMI signal, meaning the video feed is free of on-screen overlays such as focus boxes, battery indicators, or menu items.
- Continuous Video Output: The camera should be capable of providing continuous video output for extended periods without shutting down or overheating. Some DSLR models are prone to turning off the video feed after several minutes to prevent the sensor from overheating.
- USB Webcam Mode Support (Optional) Some modern DSLR and mirrorless cameras include software from the manufacturer that allows the camera to act as a virtual webcam via USB. These appear to macOS as standard webcam devices, and mimoLive can use them as video sources without additional hardware.
Many DSLRs are designed to mirror their internal screen via HDMI for use with external monitors, rather than for clean live output. Always verify that your camera supports clean HDMI for live use.
Capturing SDI Video Signals
To integrate SDI cameras into your mimoLive production, you’ll need a compatible SDI capture device. SDI is a preferred standard for professional video workflows due to its durability, long cable runs, and high-quality signal transmission. The following devices are known to work well with mimoLive and are available in different connection formats:
- Blackmagic Design DeckLink Mini Recorder (Thunderbolt)
- Blackmagic Design UltraStudio Mini Recorder (Thunderbolt)
- Blackmagic Design PCI cards in a PCIe expansion box (for example Sonnet Technologies)
- Magewell Pro Capture cards in a PCIe expansion box (for example Sonnet Technologies)
- Magewell USB Capture SDI (USB)
- AJA U-TAP (USB)
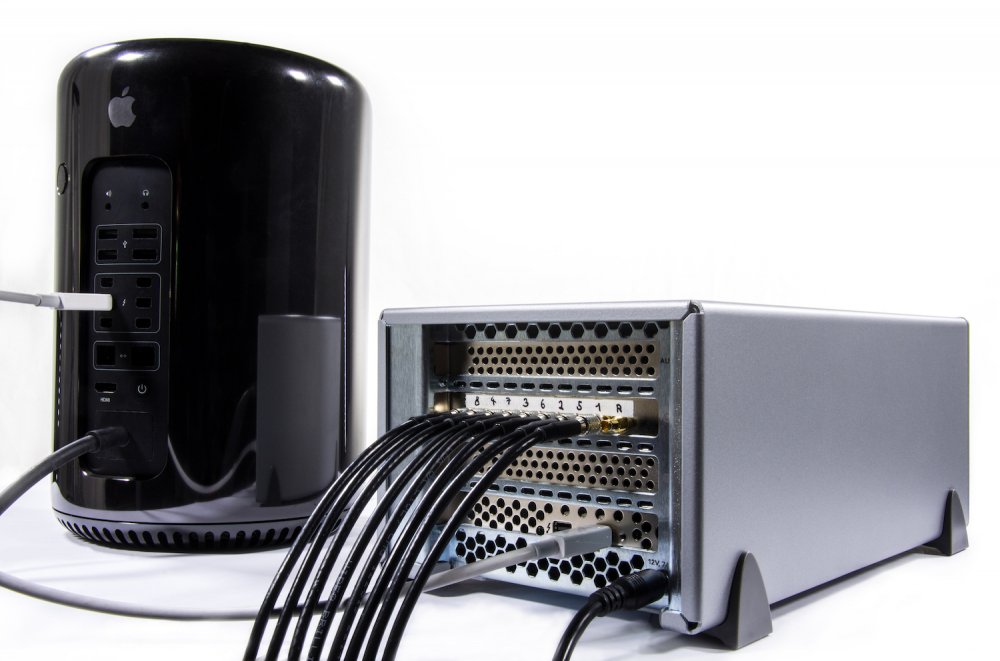
Using 8 HD SDI Sources with a Blackmagic Quad 2 card in a Sonnet Technologies Echo Express box.
Blackmagic Design Devices
If mimoLive detects that there is a Blackmagic Design device connected to your Mac, it will offer you the Blackmagic Design Video source in the Source Repository.
Using USB Webcams
USB webcams are one of the easiest and fastest ways to get started with video production in mimoLive. Most models are plug-and-play and work with macOS out of the box, without the need for additional drivers.
While convenient, USB webcams may offer lower image quality or fewer controls compared to DSLRs or professional cameras. For best results, choose a model with HD or 4K resolution and good low-light performance.
Using the Build-In FaceTime HD Camera
Most iMacs and Mac laptops come equipped with a front-facing webcam called the FaceTime HD Camera. mimoLive automatically selects this camera as the default video source when creating a new, blank document. The FaceTime HD Camera is a great option for capturing yourself in solo productions, training videos, or for use in picture-in-picture overlays.
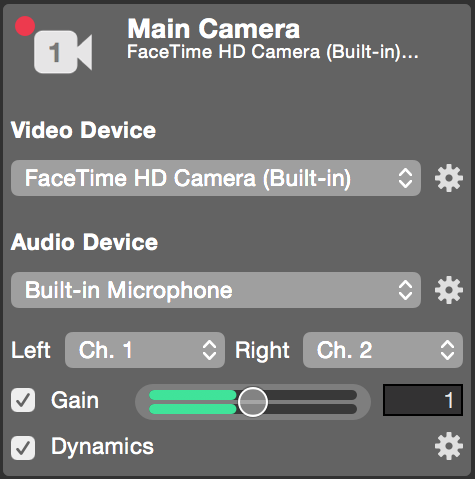
Setting Up The Video Source
In the Video popup and the Audio popup, you can select which video or audio device you are going to use in this Video Source. The action gear buttons right next to each popup let you configure the settings of the associated device. They will look different for each type of hardware device you have selected.
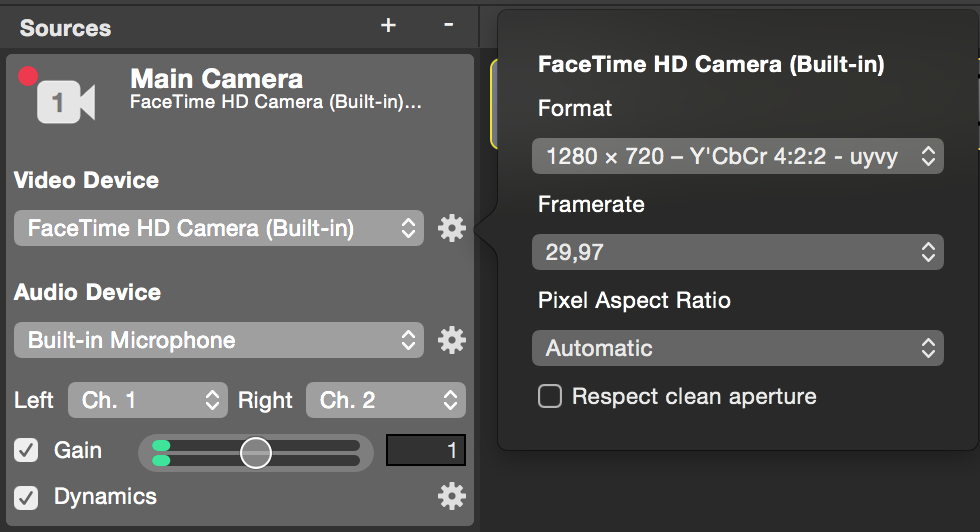
For the Video Device you have several parameters:
- Format: Here you can select the video format that is transmitted from the video hardware.
Choose a video format for your hardware that matches the usage in your document best.
If you are using a certain video camera as a small face camera in the upper right corner of your 1080p production, the video of the camera doesn’t need to be 1080p as well. It will reduce CPU and GPU performance if you choose a much smaller resolution for this video device as it is only displayed in this small resolution.
- Frame Rate: Some devices may provide different frame rates. The popup let you select one.
Choose a video frame rate for your video hardware that matches that of your document.
The input side is independent of the program output in mimoLive. Therefore the frame rates for the video source can be set independently from the program output rendering pipeline. Please choose a frame rate for your video device that matches the one in your document so that there won’t be any unnecessary performance hit on the CPU or GPU.
The Video Resolution and Video Frame Rate are provided by the hardware device.
The selectable options for resolution and frame rate is not a “preset” of mimoLive by itself. If there is a certain video resolution missing then it’s because the video device doesn’t provide it as an option to mimoLive.
- Pixel Aspect Ratio: By default, the Pixel Aspect Ratio is set to “Automatic” in will work in most cases. However, sometimes the pixel aspect ratio may vary (e.g. for an analog NTSC signal) and can’t be correctly detected by mimoLive, then you can force a certain pixel aspect ratio for this video image.
Pixel aspect ratio is not the aspect ratio of the video frame
The pixel aspect ratio describes the ratio between the width and the height of one pixel provided in the video frame. For certain video formats, this can vary (e.g. DV-PAL or DV-NTSC).
The aspect ratio of a video frame describes the ratio between the width and the height of the complete image when displayed (not the pixel dimensions but the display dimensions!)
The rendering pipeline in mimoLive runs always on square pixels.
Because the graphic cards in computers are calculating everything in square pixels, mimoLive is doing the same. Please take into account that non-square video sources will be scaled to square pixels in the video pipeline and therefore will look a bit blurry if you take a closer look.
Setting Up The Audio Device
Setting up the audio component of a Video Source in mimoLive follows the same principles as configuring a dedicated Audio Source.
For detailed guidance on selecting and configuring audio input devices, please refer to the Audio Source section of this manual.
